
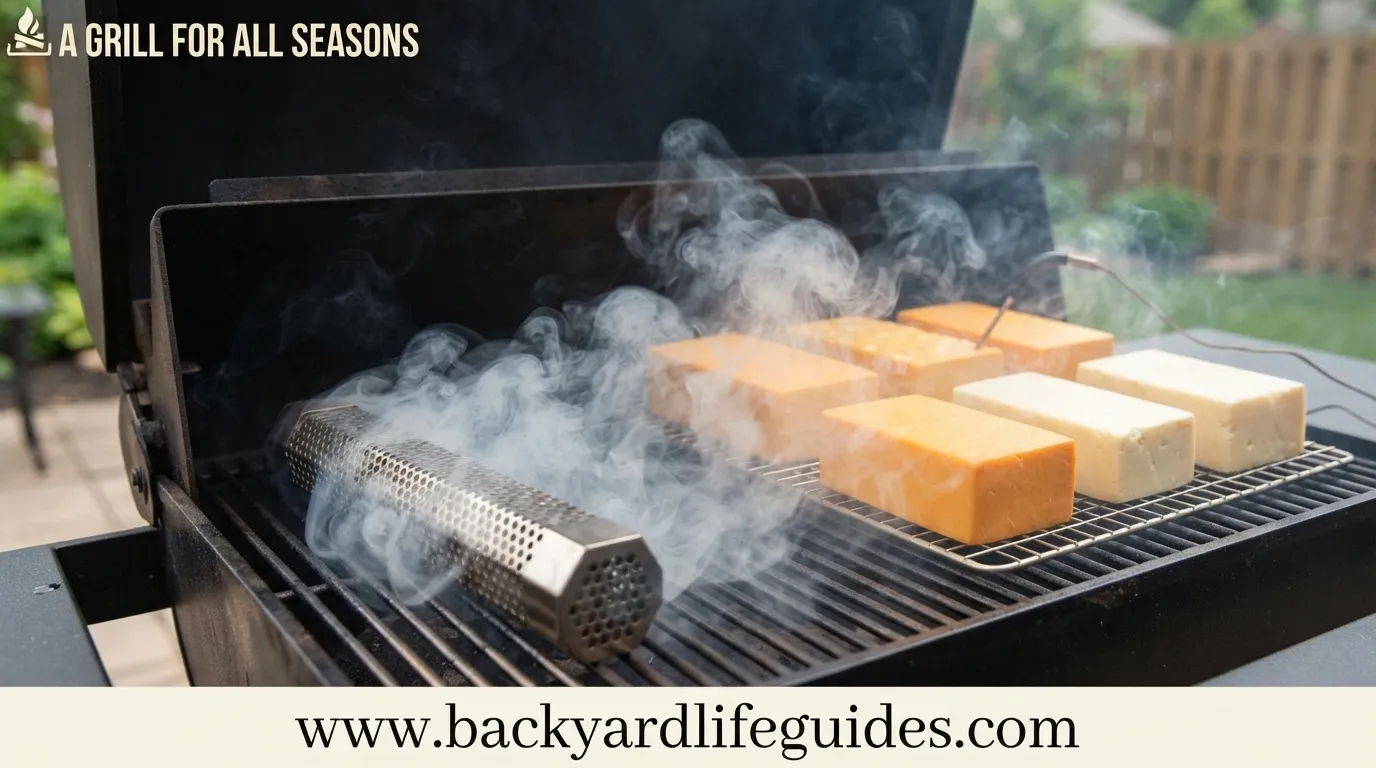
Smoked Cheese 101: How to Smoke Cheese at Home
Smoked Cheese 101: How to Smoke Cheese at Home
- Disclosure: This post may include affiliate links. If you click a link and complete a purchase, I may earn a commission. Additionally, as an Amazon Associate, I earn from eligible purchases.
Smoked cheese can turn an ordinary block of cheese into something much more flavorful. The combination of creamy cheese and gentle wood smoke creates deeper earthy, toasty, and meaty notes without needing complicated equipment. The key is controlling the temperature, choosing a cheese that can handle smoking, and giving the finished cheese enough time to mellow.
For beginners, hard and semi-hard cheeses are the easiest place to start. Cheddar, Gouda, Monterey Jack, Swiss, Gruyère, and similar cheeses can handle the low temperatures used for cold smoking while gradually taking on smoke flavor.
The most important rule is simple: keep the cheese cool. Once the temperature gets too high, the cheese can soften or begin melting instead of slowly absorbing smoke.
What Is Smoked Cheese?
Smoked cheese is cheese that has been exposed to wood smoke after it has been made. Natural smoking allows the smoke to gradually influence the cheese’s flavor while leaving its original character intact.
The final flavor depends heavily on two things: the type of cheese and the wood used for smoking. A mild cheese can take on noticeable smoke flavor quickly, while a stronger aged cheese can stand up to a more pronounced smoke profile.
Good smoked cheese should taste balanced. The smoke should complement the cheese, not completely hide its natural flavor.
What Cheese Is Best for Smoking?
For your first attempt, choose a hard or semi-hard cheese. These cheeses are less likely to soften at the low temperatures required for smoking and have a dense structure that allows the smoke flavor to develop gradually.
Good starting choices include:
- Cheddar
- Gouda
- Monterey Jack
- Swiss
- Gruyère
- Pepper Jack
- Hard mozzarella
Other cheeses can also be smoked, including provolone, scamorza, mozzarella, Brie, Camembert, and feta. However, softer cheeses require more careful temperature and time control.
If you’re completely new to smoking cheese, starting with an inexpensive block of Cheddar or Gouda is a practical way to learn before experimenting with more expensive cheeses.
What Temperature Should You Smoke Cheese At?
Temperature control is the most important part of the process.
For cold smoking, keep the smoker or grill below 90°F (32°C). A more controlled working range is around 60–80°F, while another practical approach is to keep the smoker around 90–100°F only when conditions and equipment allow it without the cheese becoming too warm.
For the safest beginner approach, aim for the lowest temperature that still produces a steady stream of smoke.
Outdoor weather matters too. Cool weather makes temperature control much easier. One of the detailed smoking methods recommends smoking when the outside temperature is 60°F or below, while the Bradley method goes much colder, around −5°C to −10°C.
The important lesson from these methods is not that everyone needs freezing weather. It’s that cool conditions make cold smoking cheese considerably easier.
Why Does Cheese Need to Stay Cool?
Cheese doesn’t need high heat to absorb smoke. The goal is to expose it to smoke while keeping its structure intact.
If the temperature rises too much, the cheese can become soft, sweaty, or start melting. That’s why cold smoking is preferred for most home cheese-smoking applications.
A thermometer is therefore one of the most useful pieces of equipment you can have.
How Long Should You Smoke Cheese?
Smoking time depends on how strong you want the smoke flavor to be.
A practical range is 1–2 hours for a lighter-to-moderate smoke, while some methods use 2–4 hours for a stronger flavor.
If you’re a beginner, don’t assume that longer automatically means better. Cheese can develop an intense smoky character, and freshly smoked cheese can taste much stronger than expected.
A good starting point is around 2 hours.
For a lighter result, try approximately 1 hour. If you want a stronger smoke profile, you can move toward 2–4 hours, while keeping a close eye on temperature.
What Wood Is Best for Smoked Cheese?
Mild woods are generally the easiest choice for cheese because they provide smoke flavor without overwhelming the cheese.
Good options include:
- Apple
- Cherry
- Maple
- Pecan
Hickory can also be used when you want a stronger smoke character. Oak is another option mentioned for cold smoking.
For your first batch, apple, cherry, or maple are sensible choices because they allow you to notice the difference between the cheese and the smoke instead of creating an overly aggressive flavor.
What Equipment Do You Need?
You don’t necessarily need a dedicated smoker.
A basic setup can use an outdoor grill together with a smoke tube or another small smoke source. Depending on the method, useful equipment can include:
- Outdoor grill or smoker
- Smoke tube or pellet tray
- Wood pellets or wood chips
- Thermometer
- Parchment paper
- Vacuum sealer or zip-top freezer bag
- Wire rack
- Ice
- Aluminum pan
A butane torch can be used to light pellets in a pellet tray or smoke tube.
The important thing is not having the most expensive equipment. It’s being able to create smoke while keeping the cheese below its melting point.
How to Smoke Cheese Step by Step
1. Choose Your Cheese
Start with a hard or semi-hard cheese such as Cheddar, Gouda, Swiss, or Monterey Jack.
Cut large blocks into manageable pieces. One recipe recommends blocks around 2–3 inches, while another detailed method uses larger pieces.
Larger pieces are useful for beginners because they give you more cheese to work with and make it easier to compare the outside smoke exposure with the interior flavor.
2. Prepare the Grill or Smoker
Don’t preheat the grill like you would for normal cooking.
The objective is smoke without cooking.
Set up your smoke tube, pellet tray, or smoke source so that it produces a steady amount of smoke while the chamber remains cool.
If you’re using wood chips, one method recommends soaking them for 45 minutes, while another recommends at least 30 minutes. Follow the approach appropriate for the equipment you’re using.
3. Create the Smoke
Fill the smoke tube or pellet tray with your chosen wood.
Apple, cherry, maple, or pecan are good mild options. Hickory can be selected when you want a stronger smoke flavor.
Light the pellets with a torch and make sure the flame has been extinguished before placing the smoke source inside the grill.
You want smoldering smoke, not an active fire.
4. Place the Cheese on the Rack
Put the cheese on the grill rack where it can receive the smoke without being exposed to direct heat.
Leave approximately 1–2 inches between pieces so air and smoke can move around them.
Good airflow helps provide more even exposure.
5. Monitor the Temperature
Keep checking the grill or smoker temperature throughout the process.
The central target for cold smoking is below 90°F. A range of 60–80°F provides a useful working target when conditions allow it.
If the temperature starts climbing, especially toward the melting point, stop the smoking process and allow the setup to cool.
This is one of the reasons cold outdoor weather is so helpful.
6. Smoke for About 2 Hours
For a first batch, 2 hours is a useful middle ground.
Smoke for around 1 hour if you prefer a lighter flavor. For a more pronounced result, some methods extend the process to 2–4 hours.
Don’t judge the final flavor immediately. Freshly smoked cheese can taste much more intense than it will after resting.
7. Rotate or Flip the Cheese
For more even exposure, rotate or flip the cheese during smoking.
One method recommends flipping after 1 hour, while another detailed technique rotates the cheese ¼ turn every 30 minutes.
If your smoke distribution is uneven, regular rotation can help prevent one side from receiving significantly more smoke than the other.
8. Let the Cheese Cool
After smoking, allow the cheese to cool before packaging it.
One method recommends approximately 1 hour at room temperature, while another detailed method leaves the cheese inside the smoker for 15 minutes before wrapping.
The goal is the same: let excess heat and surface moisture settle before sealing the cheese.
If the cheese has developed visible moisture or sweat, gently blot the surface before wrapping.
Why Should Smoked Cheese Rest for 2 Weeks?
This is one of the most important steps in the entire process.
Freshly smoked cheese can taste harsh, bitter, or overly smoky. Resting gives the smoke time to mellow and allows the flavor to distribute more naturally through the cheese.
After cooling, wrap the cheese in parchment paper and place it inside a zip-top bag or vacuum-seal it.
Then refrigerate it for at least 2 weeks.
Several of the smoking methods emphasize this aging period. One method suggests that 1 month can produce an even better result.
So while you may be tempted to taste your cheese immediately, patience can make a major difference.
How Should You Store Smoked Cheese?
After smoking and cooling, wrap the cheese carefully before refrigeration.
Parchment paper can be used first, followed by a zip-top bag or vacuum seal.
One guide recommends refrigerating smoked cheese around 35–45°F.
If you’re vacuum sealing, allow the cheese to air out for several hours first if necessary to reduce moisture buildup inside the packaging.
The goal is to keep the cheese protected while the smoke flavor continues to mellow.
Can You Smoke Cheese Without a Smoker?
Yes. A dedicated smoker isn’t required.
An outdoor grill can be adapted for cold smoking with a smoke tube or smoke box and wood pellets or chips.
An ice-pan setup can also help keep the environment cool. Place ice in an aluminum pan and monitor the setup during smoking.
When using the ice method, check it approximately every 30 minutes to make sure sufficient ice and smoke remain.
This approach is particularly useful when ambient temperatures are higher and you’re trying to keep the cheese from becoming too warm.
Cold Smoking vs. Hot Smoking Cheese
Cold smoking is generally the more suitable approach for cheese because it focuses on adding smoke without cooking the cheese.
Cold-smoking temperatures should stay below 90°F, with 60–80°F being a useful working range from the beginner-focused guidance.
Hot smoking is much more aggressive. One source describes hot-smoking temperatures around 175–300°F (80–150°C), while another beginner guide gives a much lower 90–100°F range for a hot-smoking approach.
Because the temperature ranges vary significantly between methods, the practical takeaway is simple: hot smoking requires much greater temperature control and firmer cheeses.
If you’re just starting, cold smoking is the easier method to master.
How to Get More Even Smoke Flavor
Even smoke exposure is easier when the cheese isn’t packed tightly together.
Keep approximately 1–2 inches between pieces and allow smoke to circulate around them.
Rotating the cheese can also help. You can flip it after 1 hour or rotate it every 30 minutes, depending on your setup.
Don’t try to compensate for weak smoke by dramatically increasing the temperature. Cheese needs smoke, not cooking heat.
How Much Smoke Is Too Much?
There isn’t one perfect smoking time for every cheese.
A mild Cheddar can take smoke differently from a stronger aged cheese. Wood choice also changes the result.
That’s why starting around 1–2 hours is sensible. You can adjust future batches once you understand how your particular grill, smoke source, cheese, and weather behave.
Remember that the cheese will continue to develop after smoking. What tastes overwhelmingly smoky on day one can become much more balanced after 2 weeks of refrigeration.
What Can You Make With Smoked Cheese?
Smoked cheese works well as a standalone table cheese, but its uses go far beyond a cheese board.
You can use it in:
- Pizza
- Cheeseburgers
- Mac and cheese
- Pasta
- Dips
- Cheese sauces
- Nachos
- Omelettes
- Charcuterie boards
A strongly smoked cheese can be especially useful in recipes where a small amount provides a noticeable smoky character.
Common Smoked Cheese Mistakes to Avoid
Using Too Much Heat
The biggest mistake is treating cheese like meat.
You don’t need cooking temperatures. Keep the environment cool and aim to stay below 90°F for cold smoking.
Smoking for Too Long
More smoke isn’t necessarily better.
Starting with around 2 hours gives you a useful baseline. You can increase or decrease the time in future batches.
Using Strong Wood Immediately
Hickory can produce a strong smoke profile. Beginners may find apple, cherry, maple, or pecan easier to work with.
Eating the Cheese Immediately
Freshly smoked cheese can be surprisingly harsh.
Give it at least 2 weeks to rest so the smoke can mellow.
Skipping Temperature Monitoring
Outdoor conditions can change during a smoking session.
Use a thermometer and keep checking the temperature instead of assuming the grill is staying cool enough.
FAQs
How long should you smoke cheese?
A practical starting point is about 2 hours. Around 1 hour produces a lighter smoke flavor, while 2–4 hours can create a stronger result.
What temperature is best for smoking cheese?
For cold smoking, aim for approximately 60–80°F and keep the temperature below 90°F to reduce the risk of softening or melting.
Can you smoke cheese on a regular grill?
Yes. A regular outdoor grill can be used with a smoke tube, smoke box, wood pellets, or wood chips, provided you can maintain a sufficiently cool temperature.
What is the best cheese for beginners?
Cheddar and Gouda are excellent starting choices because they are hard or semi-hard and tolerate cold-smoking conditions well.
What wood is best for smoked cheese?
Mild woods such as apple, cherry, maple, and pecan are good starting options. Hickory can be used when you want a stronger smoke flavor.
Should cheese be refrigerated after smoking?
Yes. After cooling and wrapping, refrigerate the cheese and allow it to age for at least 2 weeks before serving.
Why does smoked cheese taste bitter at first?
Fresh smoke can create a harsh flavor on the surface of the cheese. Refrigerating the cheese for 2 weeks or longer allows the smoke character to mellow and become more balanced.
Can soft cheese be smoked?
Soft cheeses such as Brie, Camembert, and feta can be smoked, but they require more careful temperature and time control than hard or semi-hard cheeses.
Do you need to flip smoked cheese?
Flipping or rotating can help provide more even smoke exposure. One method recommends flipping after 1 hour, while another rotates the cheese ¼ turn every 30 minutes.
Final Takeaway
Smoking cheese at home is less about complicated equipment and more about temperature control, moderate smoke, and patience. Start with Cheddar or Gouda, use a mild wood such as apple or cherry, and aim for roughly 60–80°F while keeping the cheese below 90°F. A smoking session of around 2 hours is a useful starting point, but the real transformation happens afterward. Cool, package, refrigerate, and give the cheese at least 2 weeks to mellow. Once you understand how your setup behaves, you can adjust the wood, cheese, and smoking time to create your preferred flavor.



One Comment