
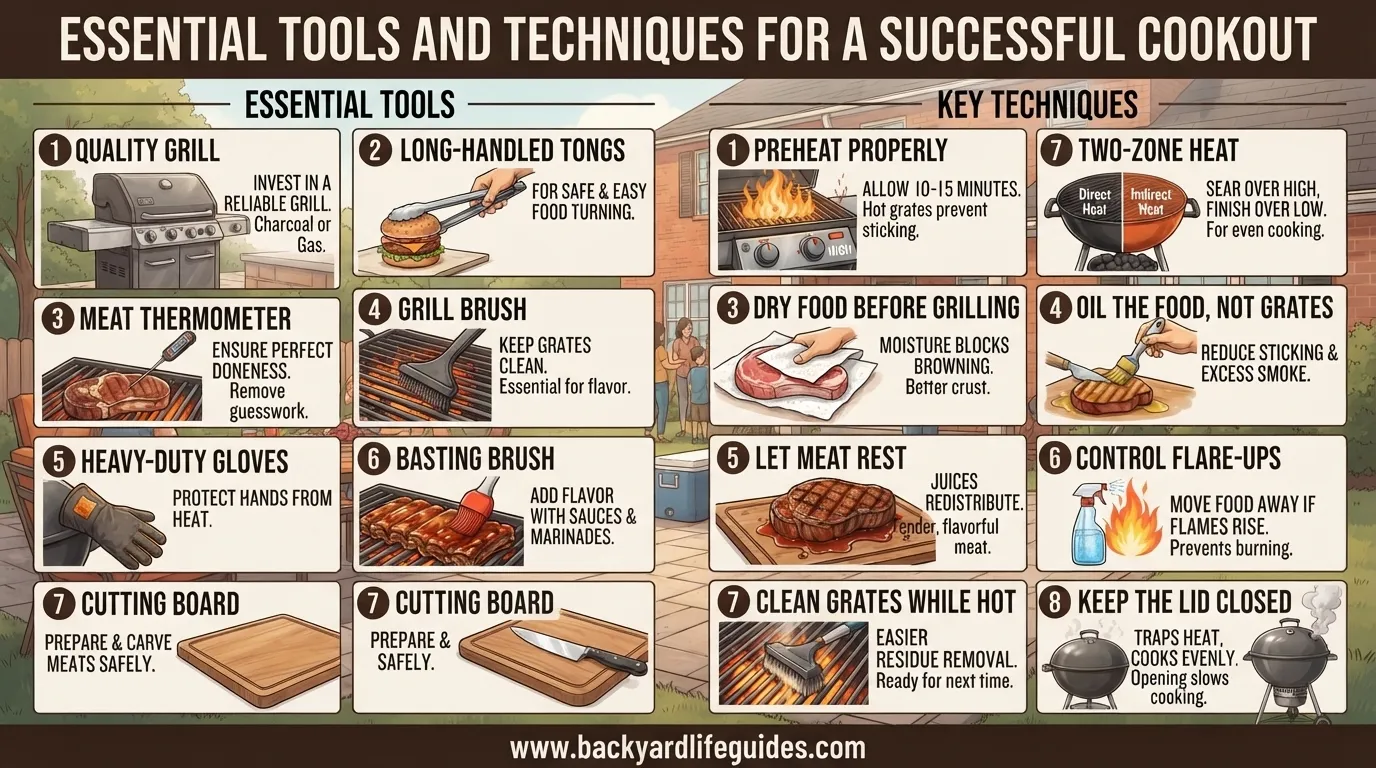
15 Essential Tools and Techniques for a Successful Cookout
How to Grill: Beginner’s Guide
- Disclosure: This post may include affiliate links. If you click a link and complete a purchase, I may earn a commission. Additionally, as an Amazon Associate, I earn from eligible purchases.
Grilling becomes much easier when you understand a few basic principles: how to prepare the grill, when to use direct or indirect heat, how to control temperature, when to flip food, and how to know when it is actually done.
Whether you are using a gas grill or a charcoal grill, you do not need complicated techniques to get started. The key is controlling heat and giving your food enough time to cook properly.
This guide brings together the most useful beginner grilling techniques into one practical process, with specific times, temperatures, measurements, and grilling methods you can actually use.
What You Need Before You Start Grilling
A good grilling session starts before the food touches the grate.
You do not need every grilling gadget available, but a few basic tools make the process considerably easier.
Essential grilling tools
| Tool | Why You Need It |
| Long-handled tongs | Turning and moving food safely |
| Instant-read thermometer | Checking internal temperature |
| Grill brush | Cleaning the cooking grates |
| Timer | Keeping track of cooking time |
| Basting brush | Applying sauces or marinades |
| Heavy-duty aluminum foil | Wrapping food or creating cooking barriers |
| Grill basket | Cooking smaller vegetables |
| Chimney starter | Lighting charcoal efficiently |
| Long matches or grill lighter | Lighting when necessary |
| Hot pads or grill gloves | Protecting your hands |
Of these, a meat thermometer is one of the most useful because appearance alone is not always a reliable indication that meat has finished cooking.
Step 1: Prepare Your Grill
Before lighting the grill, make sure the cooking area is clean.
Remove leftover food and buildup from the grates. Once the grill is heated, brush the grates again before cooking.
For a gas grill, open the lid before ignition. Then follow the lighting procedure recommended for your particular grill.
For charcoal, arrange the charcoal so you can create the heat level and cooking zones you need.
How long should you preheat a grill?
For many gas-grill setups, 10–15 minutes is a useful preheating range.
Some gas-grill instructions use temperatures around 500–550°F for preheating before adjusting the burners for cooking.
The important point is not simply to turn the grill on and immediately add food. Give the cooking grates time to become properly hot.
Step 2: Choose Gas or Charcoal
Both gas and charcoal grills can produce excellent food, but they behave differently.
Gas grill
A gas grill is particularly convenient for beginners because:
- It heats relatively quickly.
- Temperature can be adjusted using burner controls.
- Different burners can create different heat zones.
- It is convenient when you want predictable heat.
Charcoal grill
Charcoal gives you more direct interaction with the fire.
You need to manage:
- Charcoal placement
- Airflow
- Grill vents
- Heat zones
- Lighting time
A chimney starter can take approximately 30–45 minutes in the beginner process described by The Kitchn, while another charcoal setup can have briquettes fully lit in around 15–20 minutes, depending on the charcoal and lighting method.
Once charcoal is properly hot and covered with ash, it can be arranged for cooking.
Step 3: Understand Direct Heat vs. Indirect Heat
This is one of the most important concepts in learning how to grill.
Direct heat
Direct grilling means placing food directly above the heat source.
It works especially well for foods that cook relatively quickly, such as:
- Burgers
- Steaks
- Hot dogs
- Fish
- Chicken breasts
- Thin cuts
- Vegetables
The general guideline from the material is that foods taking around 20 minutes or less are good candidates for direct heat.
Indirect heat
With indirect grilling, food is positioned beside rather than directly over the main heat source.
It is better suited to:
- Whole chickens
- Ribs
- Roasts
- Thick cuts
- Large pieces of meat
It can also be used to finish thicker foods after they have been browned over direct heat.
The simple rule
Fast and thin → direct heat
Large and slow → indirect heat
This one distinction can prevent many common grilling mistakes.
For a visual explanation of direct and indirect grilling, Weber’s direct and indirect grilling guide is a useful reference.
Step 4: Create a Two-Zone Fire
A two-zone setup is especially useful when grilling with charcoal.
Place the hot charcoal on one side of the grill and leave the other side without charcoal.
You now have:
Hot zone: direct cooking and searing
Cool zone: indirect cooking and moving food away from intense heat
This setup gives you more control.
For example, you can sear a thick steak over direct heat and then move it to the cooler side to finish cooking.
It is also useful when a flare-up starts. Instead of leaving the food directly over the flames, move it to the indirect side.
Step 5: Control Your Grill Temperature
Temperature control is more important than simply following a fixed cooking time.
Useful temperature ranges from the material
| Food | Approx. Grill Temperature | Useful Cooking Information |
| Burgers | 400°F | About 4–5 minutes searing |
| Steak | 400°F | About 2–3 minutes per side before indirect finishing |
| Chicken | 350–450°F | Sear about 3–4 minutes per side |
| Pork chops | 375–400°F | About 12–14 minutes total |
| Whole chicken | — | About 60 minutes covered, then check regularly |
| Chicken wings | — | About 8–10 minutes after searing |
These are guideposts, not universal cooking guarantees. Grill models, food thickness, weather and starting temperature can change the actual cooking time.
Step 6: Keep the Grill Lid Under Control
One common beginner mistake is opening the lid repeatedly.
Every time you open it, heat escapes.
For thicker foods that need more time, keeping the lid closed helps maintain a consistent cooking environment.
For thinner foods that cook quickly, you may need to open it only when turning or checking the food.
A useful guideline from the beginner material is:
- 3/4 inch or less: the lid can remain open more often.
- More than 3/4 inch: closing the lid helps trap heat and cook more evenly.
Think of the closed grill as creating an oven-like environment around the food.
Step 7: Know When to Flip
You do not need to constantly turn food.
Let the food develop a proper sear and release naturally from the grate.
If meat sticks when you first try to turn it, give it another 1–2 minutes rather than forcing it.
For steaks
One provides a memorable 3-3-2-2 method:
- Grill for 3 minutes.
- Flip.
- Grill for 3 minutes.
- Flip.
- Grill for 2 minutes.
- Flip.
- Grill for 2 minutes.
The exact result will still depend on steak thickness, grill temperature and desired doneness.
For burgers and chicken
A simple approach is generally to avoid repeatedly flipping them. Allow one side to cook properly before turning.
Step 8: Don’t Press Down on Your Meat
This is a small habit that can make a noticeable difference.
Avoid smashing burgers or pressing steaks and chicken with a spatula.
Pressing the meat can force juices out before the food has finished cooking.
Instead, let the heat do the work.
Flip gently. Don’t squeeze.
Step 9: Grill More Than Meat
A grill can be much more versatile than burgers and steaks.
You can grill:
- Corn
- Peppers
- Zucchini
- Asparagus
- Vegetables
- Pizza
- Garlic bread
- Peaches
- Lemons
- Pineapple
- Fruit
- Fruit crisps or cobblers
A grill basket is particularly useful for smaller vegetables that could otherwise fall through the cooking grate.
This is also a good way to build a complete meal on the grill rather than treating it as a meat-only cooking appliance.
Step 10: Use a Thermometer Instead of Guesswork
A timer tells you how long food has been cooking.
A thermometer tells you what is happening inside.
That distinction matters.
grilling guides provide these examples:
| Food | Example Internal Temperature |
| Burger | 160°F |
| Chicken | 165°F |
| Pork chops | 145°F |
| Chicken wings | 175°F |
Use these figures as the specific temperature guidance from the material, and remember that thickness and cooking conditions affect how quickly food reaches its target.
The thermometer is especially helpful when you are still learning how your particular grill behaves.
Step 11: Give Meat Time to Rest
Taking meat directly from the grill to the cutting board is another common mistake.
Allowing it to rest gives the meat time to settle before cutting.
Recommended resting times
| Size of Meat | Resting Time |
| Small cuts | 5–10 minutes |
| Large cuts | 10–20 minutes |
| Steak | Around 5 minutes |
| Whole chicken | Around 15 minutes |
For larger pieces, loosely tenting the meat with foil can help retain warmth while it rests.
Step 12: Cut Against the Grain
After resting, pay attention to the direction of the muscle fibers.
Cutting against the grain shortens those fibers and can make meat easier to chew.
This is especially useful for larger cuts where the direction of the grain is easier to see.
Take a moment to identify the grain before making your first cut rather than slicing immediately.
How to Grill a Steak
Steak is one of the easiest foods for learning the fundamentals of grilling.
Basic process
- Prepare and season the steak.
- Allow it to come toward room temperature before grilling, following the preparation approach in the guidance.
- Preheat the grill.
- Clean the grates.
- Place the steak over direct heat.
- Sear the first side.
- Flip according to your preferred method.
- Move a thick steak to indirect heat if it needs more time.
- Check the internal temperature.
- Remove it from the grill.
- Rest for approximately 5 minutes.
- Cut against the grain where appropriate.
For thicker steaks, combining direct and indirect heat can provide a strong exterior sear while allowing the center to finish more gently.
How to Grill Burgers
For burgers, start with properly shaped patties and a preheated grill.
A example uses approximately 6-ounce patties, around 3/4 inch thick, at about 400°F, with approximately 4–5 minutes of searing.
The key is not to press the burger while it cooks.
Once the first side has developed a good crust, flip it and continue cooking until the appropriate internal temperature is reached.
For the example, that target is 160°F.
How to Grill Chicken
Chicken benefits from careful heat management because thicker pieces need enough time to cook through without burning the outside.
A example recommends:
- 350–450°F grill temperature
- About 3–4 minutes per side for the initial sear
- Approximately 165°F internal temperature
- Around 5 minutes resting time
For larger chicken pieces, indirect cooking can help the center cook more gently.
How to Grill a Whole Chicken
Whole chicken is a good example of why indirect heat matters.
A example uses a 4–5 lb chicken, cooked covered for approximately 60 minutes, then checked every 10–15 minutes.
An average 4 lb chicken may take approximately 90 minutes in that example.
The stated internal target is 165°F, followed by approximately 15 minutes of resting.
How to Grill in Winter
Grilling does not have to stop when temperatures fall.
The winter-focused recommends making the grill more convenient to access by moving it closer to the back door during colder months.
However, do not place the grill so close to the house that heat can damage siding or other materials.
Pay attention to wind
Wind can make grilling more difficult.
Instead of positioning the grill solely for convenience, consider the direction of wind gusts. Moving it around a corner or into a naturally protected position can reduce exposure.
The winter also discusses creating a more protected, greenhouse-like environment around the cooking area.
If you use any temporary structure around a grill, proper ventilation is essential. Never turn an outdoor grill into an enclosed cooking space.
Charcoal Temperature Control
Charcoal grilling becomes much easier once you understand the relationship between oxygen and heat.
More oxygen generally makes the fire burn hotter and faster.
Less airflow slows the fire.
The grill vents therefore play an important role in temperature management.
A two-zone charcoal setup also gives you a practical way to move food between intense direct heat and gentler indirect heat.
When additional charcoal is added to an established fire, the material gives approximately 15 minutes as an example for new unlit coals to light fully.
Common Grilling Mistakes to Avoid
Opening the lid too often
Frequent lid opening allows heat to escape and makes temperature control harder.
Pressing burgers
Pressing meat can push juices out unnecessarily.
Flipping too early
If food is sticking, it may need more time rather than more force.
Ignoring indirect heat
Large cuts can burn on the outside before the center is ready when cooked entirely over direct heat.
Cooking only by time
A recipe’s timing is a guide. Food thickness and grill conditions can change the result.
Forgetting to rest meat
Cutting immediately can work against the texture you are trying to achieve.
Putting a grill too close to the house
Winter grilling is more comfortable when the grill is accessible, but it must remain safely positioned away from heat-sensitive siding and structures.
A Simple Beginner Grilling Workflow
If you want a short process to remember, use this:
1. Clean → 2. Preheat → 3. Choose the heat zone → 4. Prepare the food → 5. Grill → 6. Flip when ready → 7. Check temperature → 8. Rest → 9. Slice
This simple sequence covers most of the fundamentals.
Quick reference
| Stage | What to Remember |
| Prepare | Clean the grill and prepare food |
| Preheat | Give the grill around 10–15 minutes when appropriate |
| Direct heat | Best for quick-cooking foods |
| Indirect heat | Best for larger or slower-cooking foods |
| Two-zone | Keep one hot side and one cooler side |
| Lid | Keep closed when maintaining heat matters |
| Flip | Don’t repeatedly turn food |
| Thermometer | Check internal temperature |
| Rest | 5–10 minutes for small cuts; 10–20 minutes for large cuts |
| Slice | Cut against the grain when appropriate |
FAQs
How long should I preheat a grill?
A common beginner guideline is around 10–15 minutes for a gas grill, although the exact time depends on the grill and desired cooking temperature.
Is gas or charcoal better for beginners?
Gas is generally easier for beginners because the heat can be adjusted directly with the burner controls. Charcoal offers more hands-on temperature management and requires attention to charcoal placement and airflow.
What is the difference between direct and indirect grilling?
Direct grilling places food directly above the heat source. Indirect grilling places food beside the heat source, allowing it to cook more gently.
When should I use indirect heat?
Use indirect heat for larger cuts, whole chickens, ribs, roasts and other foods that require longer cooking.
How do I know when to flip meat?
Allow the food to develop a sear and release naturally from the grate. If it sticks, wait another 1–2 minutes before trying again.
Should I keep the grill lid open or closed?
For thicker foods, keeping the lid closed helps maintain heat and creates an oven-like cooking environment. Thinner foods that cook quickly may require less lid time.
What temperature should a burger reach?
The material uses 160°F as the internal temperature example for burgers.
What temperature should chicken reach?
The material uses 165°F as the internal temperature example for chicken.
How long should steak rest after grilling?
A example recommends approximately 5 minutes of resting for steak.
Can I grill vegetables?
Absolutely. Vegetables such as corn, peppers, zucchini and asparagus can be grilled directly. A grill basket is useful for smaller pieces.
Can I grill during winter?
Yes. The winter-focused specifically recommends adapting grill placement to make cold-weather grilling easier. Keep the grill away from heat-sensitive structures and make sure any protected cooking arrangement has adequate ventilation.
Final Grilling Checklist
Before you start, remember these 10 essentials:
- Clean the grates.
- Preheat the grill.
- Know whether you need direct or indirect heat.
- Create a two-zone fire when useful.
- Control the temperature rather than guessing.
- Avoid opening the lid unnecessarily.
- Don’t press your meat.
- Flip when the food is ready to release.
- Check doneness with a thermometer.
- Let the meat rest before cutting.
Once these fundamentals become familiar, grilling becomes much less about guessing and much more about controlling heat, timing and technique.
For a visual walkthrough of direct and indirect grilling techniques, Weber Grill Skills: Direct vs. Indirect Heat is a useful additional resource.
15 Essential Tools and Techniques for a Successful Cookout
A successful cookout is about more than putting food on a grill. The right tools, cooking techniques, food safety practices, comfortable setup, and simple entertainment can make the entire experience easier for both the host and guests.
Whether you are using a gas, charcoal, or electric grill, a little preparation can prevent common problems such as uneven cooking, running out of ice, forgetting serving supplies, or leaving guests without shade.
This guide brings together the most useful ideas into one practical cookout plan, with 15 essential tools and techniques, important cooking times, food-safety temperatures, and setup recommendations.
1. Choose the Right Grill
The grill is the center of most cookouts, so choosing the right type is an important first step.
The three main grill options are:
| Grill Type | Best Known For |
| Gas grill | Convenient cooking and adjustable heat |
| Charcoal grill | Traditional grilling experience |
| Electric grill | An alternative for suitable outdoor cooking setups |
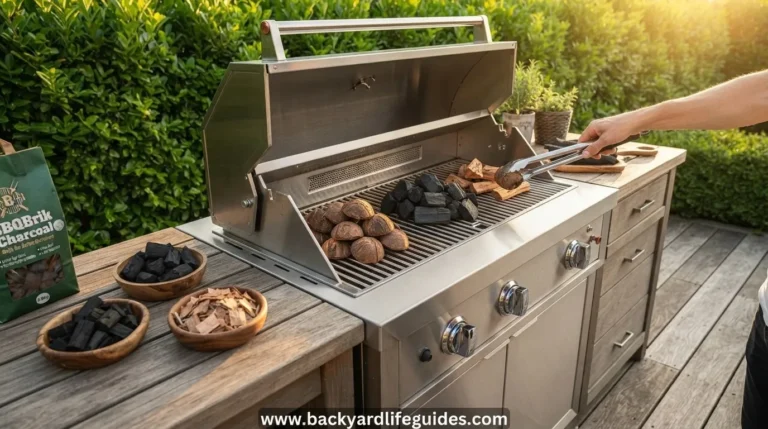
A quality gas grill may include multiple burners, ample cooking space, reliable ignition, stainless-steel construction, side burners, and a rotisserie attachment.
Your choice should depend on the type of cooking you plan to do and how much food you expect to prepare.
Before cooking
Place the grill on a stable, level surface and keep it away from flammable materials and structures. Avoid positioning it beneath overhanging branches, and make sure there is adequate ventilation.
2. Get a Reliable Meat Thermometer
A meat thermometer is one of the most useful tools for a cookout because appearance alone does not always tell you whether food is properly cooked.
Use it to monitor the internal temperature of food instead of relying only on cooking time.
For food safety, one recommends keeping perishable food at 40°F (4°C) or below and bringing cooked food to at least 165°F (74°C).
| Safety Check | Temperature |
| Refrigerated/perishable food | 40°F / 4°C or below |
| Cooked food | 165°F / 74°C or higher |
Temperature monitoring is particularly useful when cooking different foods at the same time because cooking rates can vary.
3. Prepare Essential Grilling Tools
You do not need an enormous collection of equipment, but several basic tools make grilling much easier.
The core tools
- Tongs – for turning and moving food.
- Spatula – useful for burgers and other foods that need careful flipping.
- Basting brush – for applying marinades and sauces.
- Grill brush – for cleaning the cooking surface.
- Grill scraper – another option for removing residue.
- Grilling basket – useful for foods that are difficult to manage directly on the grates.
- Grill gloves – provide protection when handling hot equipment.
- Grill light – useful when cooking conditions become darker.
- Meat thermometer – for checking internal temperature.
A practical setup can therefore be built around 9 core grilling tools without making the preparation unnecessarily complicated.
4. Preheat the Grill for About 15 Minutes
Preheating gives the grill time to reach the desired cooking condition before food is added.
One recommends preheating for about 15 minutes.
Before putting food on the grill, also consider lightly oiling the grates. This can help create a better cooking surface for the food.
Why this matters
Starting with a properly heated grill makes it easier to manage searing and finishing. It also gives you a more predictable cooking environment than placing food on a cold or partially heated grill.
5. Create Two Heat Zones
One of the most useful grilling techniques is dividing the grill into different heat areas.
Think of the setup as:
| Heat Zone | Main Purpose |
| High heat | Searing |
| Lower/medium heat | Finishing food more gently |
This gives you more control than cooking everything over the same heat.
For example, pork chops can be seared over high heat for 2–4 minutes per side and then moved to medium heat to finish cooking.
This approach is also useful when different foods require different levels of heat during the same cookout.
6. Understand Direct and Indirect Heat
Direct and indirect heat serve different purposes.
Direct heat places food directly over the hotter cooking area and is useful when you want stronger searing.
Indirect heat allows food to cook away from the strongest direct heat.
This distinction becomes particularly useful with foods that need longer cooking.
Example: bone-in chicken
The extracted information recommends approximately 30 minutes for bone-in chicken using indirect heat.
The important lesson is not to treat every food the same. Cooking time depends on the food and cooking method, so temperature should also be monitored.
7. Use Appropriate Cooking Times
Different foods require different amounts of time on the grill.
Here are the specific cooking durations identified across the content:
| Food | Cooking Guidance |
| Pork chops | Sear 2–4 minutes per side, then finish over medium heat |
| Bone-in chicken | About 30 minutes |
| Firm fish such as salmon or swordfish | 8–10 minutes |
| Corn in the husk | 15–20 minutes |
These numbers are useful starting points, but they should not replace checking the food itself. Cooking rates can vary depending on the food, grill, heat level, and setup.
8. Choose Foods That Work Well on the Grill
A good cookout menu can include more than burgers and hot dogs.
The content covers several categories of grill-friendly foods.
Meat and poultry
- Steak
- Ribeye
- New York strip
- Pork chops
- Chicken
- Whole chicken
- Spatchcock chicken
Seafood
- Salmon
- Swordfish
- Shellfish
- Shrimp
Vegetables
- Corn
- Bell peppers
- Zucchini
- Asparagus
- Grilled vegetables
- Portobello mushrooms
Fruit
- Pineapple
- Peaches
- Watermelon
For a broader menu, sides such as coleslaw, baked beans, and potato salad can complement grilled food.
9. Plan the Menu Around Your Guests
Food planning should happen before the grill is heated.
Start by considering:
- Number of guests
- Main dishes
- Side dishes
- Desserts
- Drinks
- Dietary requirements
- Vegetarian or vegan options
- Gluten-free choices
The extracted content specifically mentions options such as vegan burgers and gluten-free sides.
A simple menu structure can look like this:
| Category | Examples |
| Main courses | Burgers, hot dogs, chicken |
| Grilled vegetables | Bell peppers, zucchini, asparagus |
| Sides | Coleslaw, baked beans, potato salad |
| Fruit | Watermelon, strawberries, blueberries, grapes |
| Drinks | Water, lemonade, iced tea |
Planning categories this way makes it easier to see whether your menu is balanced before guests arrive.
10. Set Up a Dedicated Prep and Serving Area
A grill should not have to do every job.
A prep table or marinade station can provide space for preparing ingredients and organizing supplies.
Useful items include:
- Cutting boards
- Knives
- Skewers
- Whisks
- Aluminum trays
- Aluminum foil
- Plates
- Cups
- Forks
- Spoons
- Napkins
Keeping preparation and serving supplies organized can make the cooking process much less chaotic.
Keep raw and cooked food separate
Raw meat, poultry, and seafood should be kept separate from cooked food. Separate equipment for raw and cooked ingredients can also help maintain better food-handling practices.
11. Keep Food at Safe Temperatures
Temperature control is one of the most important parts of a cookout.
Perishable food should be kept at 40°F (4°C) or below, while cooked food should reach at least 165°F (74°C) according to the guidance.
A cooler filled with ice can help keep cold food and drinks chilled.
Simple temperature checklist
Before cooking: Keep perishable food cold.
During cooking: Use a food or meat thermometer.
After cooking: Keep prepared food at an appropriate serving temperature.
Avoid relying solely on how food looks. A thermometer provides a more useful measurement.
12. Prepare for Propane and Grill Safety
If you use a gas grill, propane management should be part of your preparation.
The content recommends:
- Checking propane levels before cooking
- Refilling before the tank runs out
- Closing the tank valve when it is not being used
- Storing propane with appropriate ventilation
- Keeping the tank away from direct sunlight
- Avoiding extreme temperatures
- Following the manufacturer’s connection instructions
For installation, the grill should be placed on a stable and level surface away from flammable materials.
A soap-and-water solution can be used to check connections for leaks. Bubbles can indicate a leak that needs attention.
Keep a fire extinguisher nearby
A fire extinguisher is identified as one of the essential safety tools in the content.
A first aid kit is also useful, and having someone familiar with basic first aid or CPR can add another layer of preparedness.
13. Make the Cookout Comfortable
Cooking is only part of the guest experience.
For warm weather, the extracted content recommends creating shaded and comfortable areas using:
- Canopies
- Umbrellas
- Tents
- Trees
- Fans
- Misting stations
- Cold water
- Lemonade
- Iced tea
Guests should have a place to step away from direct sunlight and take shade breaks.
Comfort becomes especially important when people are spending several hours outdoors.
14. Add Simple Entertainment
A cookout does not need complicated entertainment.
The s mention several easy options:
- Cornhole
- Giant Jenga
- Horseshoes
- Volleyball
- Water balloon toss
- Ring toss
- Ladder toss
- KanJam
- Spikeball
- DIY photo booth
- Music and speakers
- Dance party
- Sing-along
You can choose only a few activities rather than trying to provide everything.
For a simple setup, one lawn game, music, and an open area can be enough to keep guests engaged while food is being prepared.
15. Finish With Cleanup and Waste Management
Cleanup should be considered before the cookout begins.
Have these items available:
- Trash bags
- Compost bin
- Aluminum trays
- Aluminum foil
- Grill cleaning tools
- Coolers
After cooking, clean the grill and utensils as appropriate.
The content also recommends more sustainable choices such as:
- Reusable plates
- Reusable cups
- Reusable utensils
- Locally sourced food
- Organic food
- Eco-friendly cleaning products
- Food-waste reduction
- Sustainable energy options such as solar and propane
Planning waste management ahead of time makes the final cleanup much easier.
A Complete Cookout Checklist
Use this quick checklist before guests arrive.
Grill and cooking
- Choose gas, charcoal, or electric grill
- Check grill condition
- Preheat for about 15 minutes
- Oil the grates
- Prepare high and lower heat zones
- Get tongs and spatula ready
- Prepare basting brush
- Keep grill brush available
- Have a meat thermometer ready
- Keep grill gloves available
- Prepare grill light if needed
Food
- Plan the guest list
- Choose main dishes
- Prepare side dishes
- Include vegetables
- Prepare fruit or dessert
- Check dietary requirements
- Keep perishable food at 40°F / 4°C or below
- Check cooked food reaches 165°F / 74°C
Drinks and serving
- Water
- Lemonade
- Iced tea
- Cooler
- Ice
- Plates
- Cups
- Napkins
- Forks
- Spoons
Safety
- Fire extinguisher
- First aid kit
- Keep children away from the grill
- Keep pets away from the grill
- Never leave the grill unattended
- Keep the grill away from flammable materials
- Check propane levels if using gas
- Check gas connections for leaks
Comfort and entertainment
- Canopy or umbrella
- Seating
- Fans or misting station
- Music
- Lawn games
- Shade area
Cleanup
- Trash bags
- Compost bin
- Grill brush
- Cleaning supplies
- Food storage containers
What Should You Prepare First?
If you want to keep the process simple, organize your cookout in this order:
1. Plan
Choose the date, time, guest list, location, menu, dietary requirements, and backup plan.
2. Prepare the cooking area
Set up the grill on a stable surface and organize your cooking tools.
3. Prepare food and drinks
Get ingredients ready and keep perishable food properly chilled.
4. Set up comfort areas
Arrange tables, chairs, shade, cool drinks, and entertainment.
5. Start the grill
Preheat for approximately 15 minutes, oil the grates, and establish your heat zones.
6. Cook by food type
Use direct heat for searing and lower or indirect heat when appropriate. Monitor food individually.
7. Serve and maintain
Keep finished food organized, monitor temperatures, and replenish drinks or ice when needed.
8. Clean up
Clean the grill and tools, manage trash, and store remaining food appropriately.
FAQs
How many essential grilling tools do I need?
The combined content identifies 9 core grilling tools: tongs, spatula, basting brush, grill brush, grill scraper, grilling basket, grill gloves, grill light, and meat thermometer.
How long should I preheat a grill?
One recommends preheating the grill for about 15 minutes before cooking.
How long should pork chops be seared?
The extracted guidance recommends searing pork chops over high heat for 2–4 minutes per side, followed by finishing over medium heat.
How long does bone-in chicken take on the grill?
The guidance gives approximately 30 minutes using indirect heat. Actual cooking should be checked with a thermometer rather than relying only on time.
How long should firm fish cook?
Firm fish such as salmon or swordfish is listed at approximately 8–10 minutes.
How long does corn in the husk take?
The extracted grilling guidance lists approximately 15–20 minutes for corn in the husk.
What temperature should perishable food be kept at?
The content recommends keeping perishable food at 40°F (4°C) or below.
What internal temperature is recommended for cooked food?
The extracted guidance recommends at least 165°F (74°C) for cooked food.
What are the main grill types?
The s cover 3 main types: gas, charcoal, and electric grills.
What should I have besides the grill?
At minimum, prepare basic grilling tools, a meat thermometer, cooler and ice, serving supplies, food-preparation equipment, cleaning tools, and basic safety equipment such as a fire extinguisher and first aid kit.
What can I do if guests need entertainment?
Simple options include Cornhole, Giant Jenga, horseshoes, volleyball, ring toss, ladder toss, KanJam, Spikeball, music, and a DIY photo booth.
How can I make a cookout more comfortable in hot weather?
Provide shade, canopies, umbrellas, fans, misting stations, and cold drinks. Guests can also take breaks from direct sunlight.
What should I do after the cookout?
Clean the grill and utensils, organize leftovers, dispose of waste, and use reusable serving items where practical to reduce waste.
One Comment