
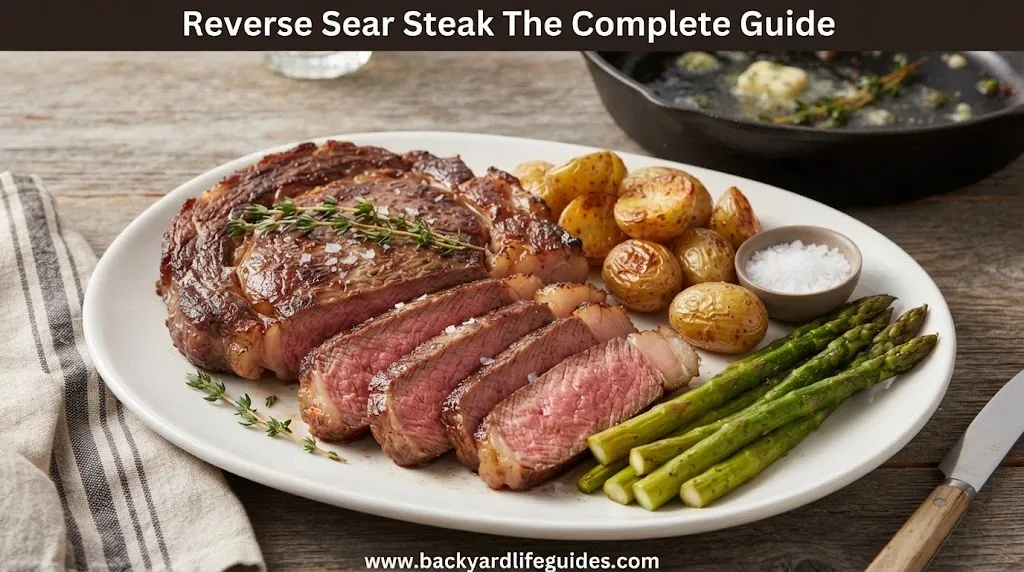
Reverse Sear Steak: The Complete Guide to a Juicy Center and Crispy Crust
Reverse Sear Steak: The Complete Guide
- Disclosure: This post may include affiliate links. If you click a link and complete a purchase, I may earn a commission. Additionally, as an Amazon Associate, I earn from eligible purchases.
If you want a steak with a deeply browned crust and an evenly cooked center, reverse searing is one of the most reliable methods to use at home. Instead of starting with a screaming-hot pan, you first cook the steak gently at a low temperature and finish it with a very hot sear.
The biggest advantage is control. The gentle first stage gradually brings the center toward your desired doneness, while the final sear concentrates on browning the outside rather than trying to cook the entire steak.
This method works particularly well with thick steaks, especially those around 1½ inches or more. Ribeye, New York strip, filet mignon, porterhouse, T-bone and thick sirloin are all good candidates.
Important: Cooking time varies considerably with steak thickness, starting temperature and equipment. Use an instant-read thermometer rather than relying on the clock alone.
What Is a Reverse Sear Steak?
A reverse sear simply changes the traditional order of cooking.
Instead of:
Hot pan → sear → finish cooking
you do:
Low-temperature cooking → thermometer check → very hot sear → rest
The low-temperature stage gently warms the steak. The final high-heat stage creates the dark, flavorful exterior associated with a great steak.
This approach is particularly useful for thick cuts because it reduces the likelihood of having a heavily overcooked outer band surrounding a less-cooked center.
The browning you want during the final stage is largely associated with the Maillard reaction, which creates many of the aromas and flavors associated with browned foods.
Why Reverse Searing Works So Well
There are several reasons this technique has become popular.
First, temperature control is easier. You are not trying to take a refrigerator-cold, thick steak all the way to medium-rare while simultaneously developing a crust.
Second, the gentle oven stage gives you a more evenly cooked interior.
Third, once the steak reaches the appropriate internal temperature, the pan can be extremely hot. You can therefore concentrate on developing a crust quickly instead of leaving the steak in the pan long enough to substantially overcook the center.
Finally, the method works especially well with thick steaks because they provide enough interior space for the gradual cooking process to make a noticeable difference.
The Best Steaks for Reverse Searing
| Steak | Recommended Thickness | Suitability |
|---|---|---|
| Ribeye | 1½–2½+ inches | Excellent |
| New York strip | 1½–2 inches | Excellent |
| Filet mignon | 1½–2 inches | Excellent |
| Sirloin | 1½–2 inches | Very good |
| Porterhouse | 1½–2+ inches | Excellent |
| T-bone | 1½–2+ inches | Excellent |
| Tomahawk | 2–3+ inches | Excellent |
| Thin steak | Under 1½ inches | Usually not ideal |
What You Need
You don’t need an elaborate setup.
Essential equipment
- Thick steak
- Wire rack
- Baking sheet
- Oven
- Instant-read or probe thermometer
- Cast-iron or other heavy skillet
- Tongs
- High-smoke-point cooking oil
- Salt
- Black pepper
A cast-iron skillet is especially useful because it can become extremely hot and retain heat when the relatively cool steak enters the pan.
A reliable thermometer is arguably the most important piece of equipment. Time estimates are useful, but the internal temperature tells you what is actually happening inside the steak.
Should You Dry-Brine the Steak?
Yes, if you have enough time.
Dry brining means salting the steak and allowing it to sit uncovered in the refrigerator before cooking.
A practical minimum is about 45–60 minutes, while several hours or overnight can provide more time for the salt to work into the meat.
For cooks who want precision, a useful salt target is approximately 1% of the steak’s weight.
For example:
| Steak Weight | Approx. Salt at 1% |
|---|---|
| 8 oz / 227 g | 2.3 g |
| 12 oz / 340 g | 3.4 g |
| 16 oz / 454 g | 4.5 g |
| 20 oz / 567 g | 5.7 g |
Reverse Sear Steak Temperature Guide
One of the most important parts of the process is knowing when to remove the steak from the oven.
Because the steak receives additional heat during searing, you generally don’t want to take it all the way to the final desired temperature during the low-temperature stage.
A practical guide is:
| Desired Doneness | Low-Oven Pull Temperature | Approx. Final Temperature |
|---|---|---|
| Rare | 105–110°F | 125°F |
| Medium-rare | 110–115°F | 130–135°F |
| Medium | 120–125°F | 140–145°F |
| Medium-well | 130–135°F | 150–155°F |
| Well-done | 140–145°F | 160–165°F |
These numbers are cooking targets, not guarantees. Different pans, ovens, steak thicknesses and searing times can change the final temperature.
For food safety, the USDA recommends that whole beef steaks reach 145°F (62.8°C) measured with a food thermometer, followed by at least a 3-minute rest.
If you’re choosing a lower doneness level for personal preference, understand that it does not correspond to the USDA’s recommended minimum safety temperature.
How to Reverse Sear Steak in the Oven
Step 1: Prepare the steak
Take your thick steak and pat the surface dry.
Season generously with kosher salt. If you’ve dry-brined the steak, add black pepper immediately before cooking or afterward according to your preference.
If you have time, allow the salted steak to sit uncovered in the refrigerator for several hours or overnight.
Step 2: Preheat the oven
Set your oven to approximately 225°F.
This temperature provides a relatively gentle cooking environment and gives you good control over the internal temperature.
Temperatures around 200–275°F can also be used, but the hotter the oven, the faster the steak will approach its target and the more closely you’ll need to monitor it.
Step 3: Use a rack
Place the steak on a wire rack positioned over a baking sheet.
This allows hot air to circulate around more of the steak instead of leaving the underside sitting directly against a flat pan.
Insert your thermometer into the thickest part of the steak.
Step 4: Cook until the target temperature
Put the steak into the oven.
Don’t use a fixed cooking time as your primary indicator.
For a steak around 1½ inches thick, the low-temperature stage may take roughly 30–40 minutes, while thicker steaks can take considerably longer.
A 2-inch steak can easily require around 45–55 minutes or more, depending on its starting temperature and your oven.
Start checking early.
Step 5: Remove before your final temperature
Once the steak reaches the appropriate pull temperature, remove it from the oven.
At this point, you’re not finished.
The steak still needs the high-temperature sear.
Should You Rest Before Searing?
A short pause can be useful while you prepare the pan, but an extended rest between the oven and sear isn’t necessary for most home cooks.
The key is to avoid letting the steak sit around long enough to become cold.
Instead, use the time to get your skillet very hot.
How to Get the Perfect Sear
This is where the reverse sear comes together.
Place a heavy skillet over high heat and let it heat thoroughly.
A cast-iron pan may need approximately 5–10 minutes, depending on the burner and cookware.
Add a small amount of a high-smoke-point oil.
Once the oil is shimmering and the pan is extremely hot, carefully place the steak in the skillet.
Sear quickly
A practical starting point is:
30–60 seconds per side.
For a particularly strong crust, flip the steak frequently rather than leaving it stationary for a long period.
For example:
- Sear first side for about 45–60 seconds.
- Flip.
- Sear the second side for about 45–60 seconds.
- Sear the edges briefly if needed.
- Check the internal temperature.
The exact timing depends on how aggressively your pan heats and how much browning the steak already has.
The goal is deep browning without significantly increasing the interior temperature.
How to Get a Better Crust
A beautiful crust is mostly about controlling surface moisture and heat.
Before the steak enters the skillet, make sure its surface is dry.
Don’t overcrowd the pan.
Don’t use a low pan temperature.
And don’t leave the steak sitting in the skillet for several minutes simply because you’re waiting for browning to happen.
The steak has already been cooked internally. The sear is primarily about developing the exterior.
If the crust is still too light after the first side, a second short contact with the pan is usually better than dramatically extending one continuous sear.
Should You Add Butter?
Butter can add excellent flavor, but it should generally be added near the end, rather than at the beginning.
For a simple finishing baste, add:
- 1 tablespoon butter
- 1 crushed garlic clove
- Rosemary or thyme
Once the steak has developed its initial crust, add the butter and aromatics.
Tilt the pan slightly and spoon the foaming butter over the steak for a short period.
This gives you the flavor of butter and herbs without exposing the butter to unnecessarily long periods of extreme heat.
Don’t Forget the Fat Cap
If your steak has a thick fat edge, hold it vertically with tongs and press the fat against the hot pan.
Give it approximately 30–90 seconds, depending on thickness.
This renders some of the surface fat and gives the edge additional browning.
It’s particularly useful with fatty ribeye, strip and tomahawk steaks.
Reverse Sear Steak: Complete Timing Guide
There is no single cooking time that works for every steak.
Thickness is one of the biggest factors.
| Thickness | Approx. Low-Oven Time at 250°F | Main Target |
|---|---|---|
| 1–1½ inches | 20–30 min | Thermometer |
| 1½ inches | 30–40 min | Thermometer |
| 2 inches | 45–55 min | Thermometer |
| 3 inches | 60–75+ min | Thermometer |
These are rough estimates only.
A steak straight from the refrigerator will behave differently from one that has been sitting out briefly. Oven calibration also varies.
For that reason, temperature should always outrank the clock.
The Complete Reverse Sear Steak Method
Here’s the entire process in a simple format.
Preparation
- Choose a steak approximately 1½–2 inches thick.
- Pat it dry.
- Season with kosher salt.
- Dry-brine for at least 45–60 minutes, preferably several hours or overnight.
- Add black pepper if desired.
Low-temperature cooking
- Preheat oven to 225°F.
- Place steak on a wire rack over a baking sheet.
- Insert a thermometer into the thickest section.
- Cook until it reaches your selected pull temperature.
Searing
- Heat a heavy skillet over high heat.
- Add high-smoke-point oil.
- Sear for approximately 30–60 seconds per side.
- Sear the edges.
- Add butter and herbs near the end if desired.
- Check the final internal temperature.
Finishing
- Remove the steak from the pan.
- Let it rest for at least 3 minutes for food-safety purposes; a somewhat longer uncovered rest can also be used for serving quality.
- Slice against the grain.
- Serve immediately.
Oven vs. Grill Reverse Sear
The same basic principle works with both methods.
| Method | Low-Heat Stage | High-Heat Stage | Best For |
|---|---|---|---|
| Oven + skillet | 200–275°F oven | Hot cast iron | Indoor cooking |
| Grill | Indirect 225–300°F | Direct high heat | Smoky flavor |
| Big Green Egg | Around 250–300°F | Around 550°F | Charcoal/grill enthusiasts |
With a grill, cook the steak over indirect heat first.
Once it approaches the desired pull temperature, move it over direct high heat for the crust.
This approach is particularly useful when you want smoky or grilled flavor without sacrificing the temperature control of reverse searing.
What Temperature Should You Use?
For an oven-based reverse sear, 225°F is an excellent starting point.
You can also work in the broader 200–275°F range.
Choose around 200–225°F if:
- You want maximum control.
- You are cooking a very thick steak.
- You’re comfortable waiting longer.
- You want to minimize aggressive temperature changes.
Choose around 250–275°F if:
- You want the process to move faster.
- You’re cooking multiple steaks.
- You are comfortable monitoring the thermometer closely.
The important thing isn’t finding one magical oven temperature.
It’s maintaining a gentle first stage and using internal temperature to decide when to move to the sear.
Common Reverse Searing Mistakes
Using a thin steak
A steak under about 1½ inches may cook so quickly that the technique provides fewer advantages.
Following time instead of temperature
Two steaks of identical thickness can cook differently.
Use a thermometer.
Starting with a wet steak
Moisture on the surface makes it harder to develop a strong crust.
Pat the steak dry before cooking and again before searing if necessary.
Searing in a lukewarm pan
The final stage needs serious heat.
If the pan isn’t hot enough, the steak may spend too long in contact with the surface before browning.
Leaving it in the pan too long
The steak is already close to its final internal temperature.
The sear should be short and aggressive.
Adding butter too early
Butter can burn at extremely high temperatures.
Use oil for the initial sear and introduce butter toward the end.
Cutting immediately
A short rest allows the steak to settle before slicing.
Avoid wrapping it tightly in foil if maintaining a crisp crust is important; trapped steam can soften the exterior.
Can You Reverse Sear a Sirloin?
Yes.
Sirloin is leaner than ribeye, so reverse searing can be especially useful when you want greater control over its internal doneness.
Choose a 1½–2-inch-thick sirloin when possible.
Use the same basic process:
225°F oven → thermometer → hot skillet → quick sear → rest.
Because sirloin contains less fat than ribeye, avoid excessively long cooking or searing. A thermometer is particularly valuable here.
Can You Reverse Sear Ribeye?
Absolutely.
Ribeye is one of the best candidates because its thickness and marbling work well with the technique.
A thick ribeye can handle:
- Low-temperature oven cooking
- A very hot cast-iron sear
- Brief fat-cap rendering
- Butter and herb basting
For a heavily marbled ribeye, you may not need much additional butter because the steak already brings considerable fat and flavor.
Can You Reverse Sear Filet Mignon?
Yes.
Filet mignon benefits from the temperature control of reverse searing, especially when the steaks are thick.
Because filet is relatively lean, avoid overcooking it.
A 1½–2-inch filet is an excellent candidate.
Use a thermometer and keep the final searing stage short.
How to Slice a Reverse-Seared Steak
After resting, look at the direction of the muscle fibers.
Then cut across the grain, rather than parallel to it.
For larger steaks such as strip, sirloin or flank-style cuts, this can make a noticeable difference in perceived tenderness.
For bone-in steaks, remove the meat from the bone if desired and then slice it into manageable pieces.
What to Serve With Reverse Sear Steak
Because the steak itself is rich and flavorful, simple sides usually work best.
Good options include:
- Roasted potatoes
- Crispy fries
- Grilled vegetables
- Green beans
- Asparagus
- Creamed spinach
- Simple salad
- Garlic mushrooms
- Chimichurri
- Peppercorn sauce
For a particularly rich ribeye, acidic or herb-forward sides can help balance the fat.
Food Safety Matters
Reverse searing is a cooking technique, not a food-safety shortcut.
The USDA recommends using a food thermometer and cooking whole beef steaks to at least 145°F, followed by at least a 3-minute rest.
If your steak is mechanically tenderized, extra care is particularly important because bacteria can potentially be introduced below the surface. The USDA likewise recommends a minimum internal temperature of 145°F for mechanically tenderized beef.
For the safest approach, follow the temperature guidance on your meat packaging and current food-safety recommendations.
FAQs
Is reverse searing better than traditional searing?
For thick steaks, reverse searing offers excellent temperature control and can produce a more evenly cooked interior with a strong crust. Traditional searing can still be faster and works well for thinner steaks.
What is the best steak thickness for reverse searing?
Around 1½–2 inches is a very practical range. Steaks thicker than 2 inches can also work extremely well, but they require more time in the low-temperature stage.
What temperature should I reverse sear a steak at?
Start with an oven around 225°F. You can work between roughly 200°F and 275°F depending on how quickly you want the steak to cook.
How long does reverse searing take?
For a 1½-inch steak, approximately 30–40 minutes in a low oven is a reasonable starting estimate. A 2-inch steak may take around 45–55 minutes. However, temperature—not time—should determine when you move to the searing stage.
Do I need to flip the steak in the oven?
No. A wire rack allows air to circulate around the steak, so flipping isn’t essential during the low-temperature stage.
How long should I sear the steak?
Start with roughly 30–60 seconds per side in a very hot skillet. The exact time depends on how hot your pan is and how dark you want the crust.
Can I use olive oil?
For very high-heat searing, a high-smoke-point oil such as avocado or another suitable cooking oil is generally a better choice. Butter can then be added toward the end for flavor.
Should I rest the steak after reverse searing?
Yes. Allowing it to rest briefly before slicing is useful. For food safety, the USDA recommends at least 3 minutes after reaching 145°F for whole beef steaks.
Can I reverse sear a steak on a grill?
Yes. Cook it over indirect heat first, then move it to the hottest part of the grill for the final sear.
Can I reverse sear a steak on a Big Green Egg?
Yes. A Big Green Egg works particularly well because you can use indirect low heat first and then increase the heat substantially for the final sear.
Do I have to dry-brine overnight?
No. Overnight is convenient, but even 45–60 minutes can be useful. If you’re short on time, season the steak immediately before cooking and focus on drying the surface thoroughly.
Why is my reverse-seared steak gray inside?
If the steak has a large gray band around the outside, it may have spent too long at a relatively high cooking temperature before the sear. Lower oven temperatures and closer thermometer monitoring can help reduce this effect.
Final Takeaway
The secret to a great reverse sear steak isn’t one magic cooking time. It’s controlling each stage.
Start with a thick steak, season it properly, and dry-brine when possible. Cook it gently at around 225°F, monitor the internal temperature, and remove it before it reaches your final target. Then transfer it to an extremely hot skillet and sear quickly enough to create a deep crust without overcooking the center.
Once you understand that the oven is primarily for controlled interior cooking and the skillet is primarily for rapid browning, reverse searing becomes much easier to repeat.
For additional technique and food-safety guidance, these are useful references: Serious Eats — Reverse-Seared Steak and USDA — Safe Internal Temperatures for Beef.

5 Comments