
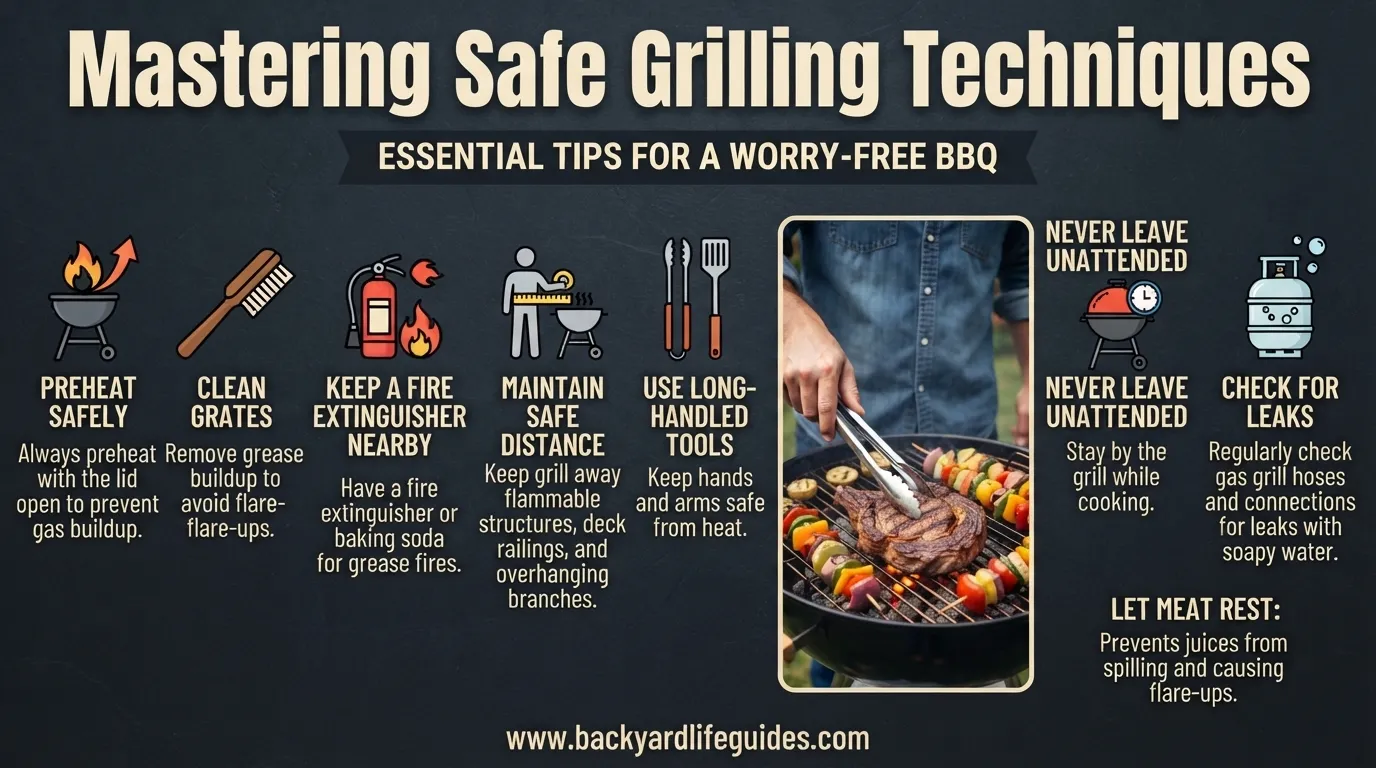
Mastering Safe Grilling Techniques: 25 Essential Tips for Better BBQs
Mastering Safe Grilling Techniques
- Disclosure: This post may include affiliate links. If you click a link and complete a purchase, I may earn a commission. Additionally, as an Amazon Associate, I earn from eligible purchases.
Grilling should be about good food, great flavor, and enjoying time outdoors—not worrying about avoidable mistakes. Whether you use a charcoal grill, gas grill, or another outdoor setup, a few simple habits can make your cooking safer and more consistent.
The key is to control the heat, prepare your cooking area, handle food properly, and know what to do when grease or flames become a problem. The following techniques bring together the most practical grilling recommendations into one easy-to-follow guide, with useful temperatures, cooking times, distances, and maintenance intervals.
1. Choose a Safe Location
Where you place your grill matters before you even light it.
Set the grill on a stable, level surface where it cannot easily tip over. Keep it outdoors and away from structures, vegetation, and areas where children or pets normally play.
A useful safety target is to keep the grill at least 10 feet away from buildings, balconies, deck railings, overhanging branches, and similar combustible structures.
Avoid placing the grill beneath low roofs, awnings, branches, or other overhead materials.
2. Check the Weather Before Grilling
Wind can turn a normal grilling session into a safety problem.
Strong gusts can carry sparks and hot embers away from the grill, particularly when cooking with charcoal. If the weather is excessively windy, consider postponing the cook.
A sheltered location can help, but the grill should still have good outdoor ventilation and adequate clearance from combustible materials.
3. Keep Children and Pets Away
Create a clearly defined 3-foot no-play zone around the grill.
Children and pets may not recognize how quickly a hot grill, lid, tool, or grease flare-up can cause an injury. Keep grilling utensils where children cannot reach them, and never leave a hot grill unattended.
For additional protection, establish the safety zone before you begin cooking rather than trying to create one after the grill is already hot.
4. Gather the Right Grilling Tools
The right equipment makes grilling easier and gives you better control.
Useful tools include:
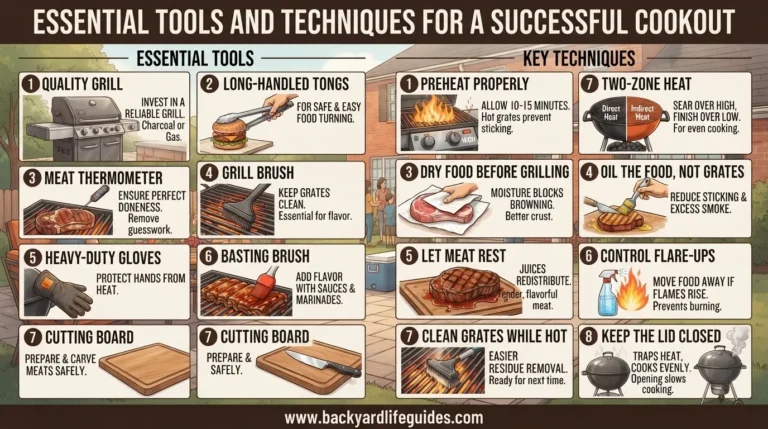
- Long-handled tongs for turning and moving food.
- Long-handled spatulas for burgers and delicate foods.
- Heat-resistant gloves for handling hot equipment.
- A chimney starter for charcoal.
- A reliable grill or food thermometer.
- A sturdy grill brush for cleaning the grates.
- A fire extinguisher kept within easy reach.
For larger or more varied cooks, grill baskets and skewers can also make handling vegetables and smaller ingredients easier.
5. Inspect the Grill Before Lighting
Give the grill a quick inspection before every cooking session.
Look for:
- Grease buildup
- Damaged or worn components
- Rust
- Dirty grates
- Problems with gas hoses or connections
For a gas grill, inspect the hose and connections before lighting. A soapy-water test can help identify a gas leak: bubbles appearing around a connection can indicate escaping gas.
Do not start cooking until any suspected gas or equipment problem has been addressed.
6. Preheat the Grill Properly
Skipping preheating is one of the easiest ways to get inconsistent results.
For most grilling situations, allow approximately 10–15 minutes for a gas grill to preheat.
A charcoal grill generally needs around 20–30 minutes to become properly ready, depending on the charcoal and cooking setup.
Preheating also helps loosen food residue from the grates, making cleaning easier.
7. Learn the Main Heat Ranges
Understanding temperature is more useful than simply turning a burner to high or low.
A practical temperature guide is:
- High heat: 450–650°F
- Medium-high: 375–450°F
- Medium: 300–375°F
- Smoking: 225–300°F
- Most everyday grilling: approximately 400–450°F
Vegetables and delicate fish often benefit from temperatures around 350°F rather than extremely high heat.
Remember that the temperature inside the grill and the temperature of the food are two different things. A grill-lid thermometer should not automatically be assumed to be perfectly accurate.
8. Use Two-Zone Cooking
One of the most useful grilling techniques is creating direct and indirect heat zones.
Direct heat places food directly above the main heat source. It works particularly well for foods that cook relatively quickly, generally 30 minutes or less, including steaks, burgers, chops, peppers, and zucchini.
Indirect heat places food beside the main heat source rather than directly over it. It is useful for larger cuts and foods that need more gradual cooking, such as roasts and whole chickens.
A two-zone setup also gives you somewhere to move food when flames suddenly become too aggressive.
9. Light Charcoal Without Relying on Lighter Fluid
A chimney starter provides a practical way to get charcoal going without adding lighter fluid directly to the coals.
Place newspaper underneath the charcoal and allow the chimney to heat the coals. One of the summarized grilling guides indicates that approximately 15 minutes can produce smoldering coals using this approach.
The chimney should have sufficient openings at the bottom to allow airflow.
Once the charcoal is ready, carefully distribute it according to whether you want direct heat, indirect heat, or a two-zone arrangement.
10. Open the Lid When Lighting a Gas Grill
Gas grills require a different lighting approach.
Always open the grill lid before ignition. This helps prevent gas from accumulating inside the cooking chamber.
Use the grill’s ignition system or an appropriate long lighter according to the grill’s design.
Most importantly, grills are for outdoor use only. Never operate or light a grill inside a house, garage, tent, or other enclosed space.
11. Clean the Grates Before Cooking
Dirty grates can affect both flavor and food safety.
After preheating, residue becomes easier to remove. Use a sturdy grill brush to clean the cooking surface.
The recommended routine is to clean the grates before or after every use while they are still warm, taking appropriate care around hot surfaces.
If a grill brush is unavailable, one of the summarized sources suggests using a ball of aluminum foil as an alternative cleaning aid.
12. Deep-Clean the Grill Regularly
Grate cleaning is not enough.
During an active grilling season, a monthly deep clean can help control accumulated grease and residue. The grill interior may also need attention after several uses, especially when cooking fatty foods.
Removing old ash from a charcoal grill is another important part of maintenance.
Regular cleaning isn’t just about appearance—it can also reduce grease buildup and the likelihood of flare-ups.
13. Control Grease Before It Becomes a Problem
Fatty foods can produce sudden flames when dripping grease reaches the heat source.
Trim excessive fat when appropriate, particularly from very fatty cuts. A drip pan can also help collect excess grease.
If flames suddenly increase, move the food to a cooler or indirect section of the grill rather than allowing it to remain directly over the flare-up.
High-fat foods, oily marinades, and sugary sauces can all contribute to flare-ups.
14. Never Use Water on a Grease Fire
This is one of the most important safety rules.
Do not pour water onto a grease fire.
Water can make a grease fire spread rather than extinguish it. Keep an appropriate fire extinguisher nearby, and the summarized safety guidance also mentions sand as an option for controlling certain small flames.
Baking soda or salt may be used to smother some small flames, but never put yourself at risk trying to control a fire that is becoming larger or uncontrollable.
15. Know When to Move Food Away From the Flames
Flames are not the same thing as useful cooking heat.
If a flare-up develops, move the food to the cooler side of a two-zone grill. This lets the food continue cooking without sitting directly above the flames.
Avoid repeatedly moving food back and forth. Instead, allow the flare-up to settle while maintaining control of the cooking environment.
16. Avoid Over-Charring Your Food
High heat can create excellent browning, but excessive exposure can quickly turn into burnt food.
For chicken thighs and drumsticks, a useful approach is to begin over higher heat to develop color and then move the pieces to indirect heat to finish cooking.
This gives you better control than leaving them directly over intense flames for the entire cooking period.
17. Stop Flipping Food Repeatedly
Constantly turning meat can interfere with proper browning.
Allow food to develop a crust before turning. One summarized guide recommends approximately 3–4 minutes before attempting to turn most foods, although the exact time depends on the food and heat level.
If food appears stuck to the grate, don’t immediately force it loose. Waiting another 1–2 minutes can allow the surface to release more naturally.
18. Don’t Press Your Burgers
Avoid repeatedly pressing burgers with a spatula.
Pressing can force flavorful juices out of the meat and onto the heat source, potentially creating additional flare-ups.
Instead, allow the burger to cook undisturbed until it is ready to turn.
19. Avoid Opening the Lid Too Often
Every time you open the lid, heat can escape.
Frequent checking can make temperature control more difficult and extend cooking time. Keep the lid closed when appropriate and use a thermometer rather than repeatedly opening the grill just to inspect the food.
20. Use a Food Thermometer
Visual appearance alone is not a reliable way to determine whether food has reached a safe internal temperature.
An instant-read thermometer is one of the most useful tools for grilling.
The summarized sources identify 145°F for fish. They also give approximately 120°F for shrimp in one culinary guide, while another recommends cooking shrimp for roughly 2–3 minutes per side.
Use the appropriate temperature guidance for the specific food you are cooking rather than relying only on color.
21. Keep Raw and Cooked Food Separate
Cross-contamination can happen before the food ever reaches the grill.
Use separate plates and utensils for raw and cooked food. Don’t place cooked meat back onto a plate that previously held raw meat unless it has been properly cleaned.
Wash your hands before and after handling raw meat, poultry, or seafood.
Keep cold foods properly chilled, with one summarized guide recommending storage at or below 40°F until they are ready for cooking or serving.
22. Give Marinades and Rubs Enough Time
Marinating and seasoning can improve both flavor and texture, but different foods need different amounts of time.
For tougher cuts, a marinade can be used for approximately 4–24 hours.
Delicate fish generally needs much less time—around 30 minutes or less.
Dry rubs can be applied approximately 30 minutes–2 hours before grilling.
Marinades should remain refrigerated, and used marinade should be discarded rather than reused as a sauce unless it has been safely handled and cooked appropriately.
23. Let Meat Rest Before Cutting
Taking food directly from the grill to the cutting board can release juices before they have a chance to redistribute.
A practical average resting period is approximately 10 minutes, while smaller portions may need less and larger cuts may need longer.
One summarized grilling source also notes approximately 5°F of carryover cooking as normal.
Resting is a small step, but it can make the finished meat noticeably more enjoyable.
24. Shut Down the Grill Correctly
Your grilling session isn’t finished when the food comes off the grate.
For a gas grill:
- Turn off the burners.
- Turn off the gas supply.
- Confirm that the grill is no longer producing heat or flame.
For charcoal:
- Stop the airflow by closing the vents.
- Allow the coals to cool completely.
- Never dump hot coals.
- Dispose of ashes only after they are completely cool.
- Use a suitable metal container for ash disposal.
Never assume charcoal is safe simply because visible flames have disappeared.
25. Store Equipment Safely
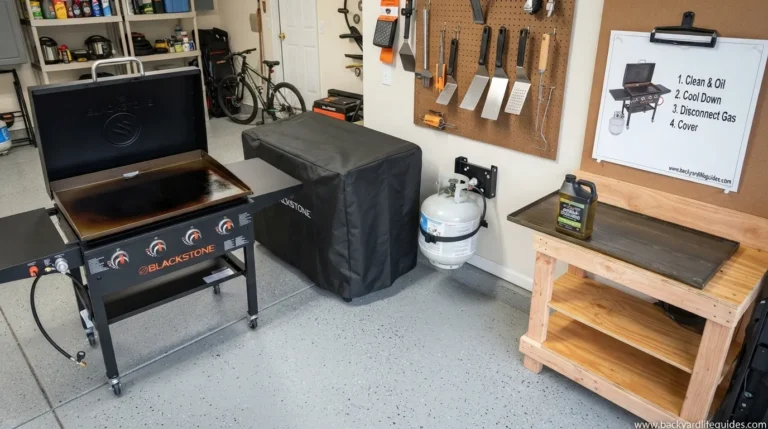
Once the grill has completely cooled, clean it and store related equipment safely.
Propane containers should be kept upright and outdoors, away from enclosed locations such as garages or sheds and away from combustible materials.
Keep grilling tools clean and stored where children cannot access them.
A few minutes of cleanup after every session can make the next grilling day safer and easier.
Charcoal vs. Gas: What Changes?
Many basic grilling principles apply to both charcoal and gas grills, but their operation is different.
Charcoal Grills
Charcoal requires time to heat and benefit from a chimney starter rather than lighter fluid.
Allow approximately 20–30 minutes for charcoal preparation, with a chimney starter potentially producing smoldering coals in around 15 minutes according to the summarized guidance.
Closing the vents after cooking reduces oxygen and helps extinguish the charcoal.
Gas Grills
Gas grills generally preheat faster, often requiring around 10–15 minutes.
Before lighting, inspect the gas connections and open the lid. After cooking, turn off the burners and then the gas supply.
Gas grills don’t require a charcoal chimney, but proper ventilation and gas-connection checks remain essential.
Direct Heat vs. Indirect Heat
Knowing when to use each method makes grilling considerably easier.
Direct heat is best for relatively quick-cooking foods. Think steaks, burgers, chops, peppers, and zucchini.
Indirect heat is better for larger foods or items that need longer cooking without constant exposure to intense heat.
For smoking, the summarized culinary guidance places the cooking environment around 225–300°F.
Using both zones gives you more flexibility because food can be moved away from intense heat whenever necessary.
Common Grilling Mistakes to Avoid
Even experienced grillers can fall into a few predictable habits.
Avoid:
- Starting without preheating.
- Overcrowding the grill.
- Cooking everything over high heat.
- Opening the lid repeatedly.
- Flipping food too frequently.
- Pressing burgers.
- Using excessive lighter fluid.
- Applying sugary sauce too early.
- Cooking over uncontrolled flames.
- Using dirty grates.
- Mixing raw and cooked utensils or plates.
- Skipping the resting period.
- Leaving the grill unattended.
- Storing propane incorrectly.
- Treating hot charcoal as if it were already extinguished.
Fixing these habits can improve both safety and cooking consistency.
A Simple Grilling Safety Checklist
Before lighting:
- Place the grill on a level surface.
- Maintain at least 10 feet of clearance from structures and overhead hazards.
- Check the weather.
- Inspect the grill and gas connections.
- Clean the grates.
- Keep children and pets at least 3 feet away.
- Have a fire extinguisher available.
While cooking:
- Preheat for approximately 10–15 minutes on gas or 20–30 minutes for charcoal.
- Monitor the grill temperature.
- Use direct and indirect heat appropriately.
- Keep raw and cooked food separate.
- Use a food thermometer.
- Control grease and flare-ups.
- Never leave the grill unattended.
After cooking:
- Turn off the gas supply on a gas grill.
- Close charcoal vents.
- Let charcoal cool completely.
- Clean the grates while appropriately warm.
- Remove excessive grease and ash.
- Store equipment safely.
FAQs
What temperature is best for grilling?
For many everyday grilling tasks, approximately 400–450°F is a useful target. However, the ideal temperature depends on the food. High heat can reach 450–650°F, while smoking commonly uses approximately 225–300°F.
How long should I preheat a grill?
A gas grill generally needs around 10–15 minutes. A charcoal grill typically requires approximately 20–30 minutes to become ready for cooking.
How far should a grill be from a house?
A strong safety guideline is at least 10 feet from buildings, balconies, deck railings, overhanging branches, and similar hazards.
How far should children stay from a grill?
Create a minimum 3-foot child-free zone around the grill and keep children away from hot grilling tools.
Is lighter fluid necessary for charcoal?
No. A chimney starter can be used to ignite charcoal without relying on lighter fluid.
How long does a chimney starter take?
The summarized safety guidance indicates that a chimney starter can produce smoldering coals in approximately 15 minutes, although actual timing can vary with conditions and charcoal.
Can I use water on a grease fire?
No. Never pour water onto a grease fire. Move away from the danger and use appropriate fire-safety equipment when it is safe to do so.
What temperature should fish reach?
The summarized culinary guidance recommends 145°F for fish.
How long should meat rest after grilling?
Approximately 10 minutes is a useful general guideline, although smaller and larger cuts may require different resting times.
How often should I clean my grill?
Clean the grates after every use while warm, using appropriate care around hot surfaces. A deeper grill cleaning is recommended approximately monthly during active grilling season, with additional interior cleaning after several uses when grease or residue accumulates.
Is grilling the same as barbecuing?
Not exactly. Grilling generally uses direct, higher heat and shorter cooking times, while barbecuing traditionally relies more on indirect, lower heat and longer cooking, often with smoke.
Final Thoughts
Great grilling is less about complicated tricks and more about controlling the basics. Give the grill enough time to preheat, maintain a safe 10-foot clearance, create a 3-foot child-free zone, control your cooking temperature, and keep raw and cooked food separate.
Use direct and indirect heat strategically, monitor internal temperatures, manage flare-ups carefully, and never rush the shutdown process. With these habits in place, you can make grilling safer, cleaner, and more consistent while spending less time dealing with preventable problems and more time enjoying the food.
3 Comments