
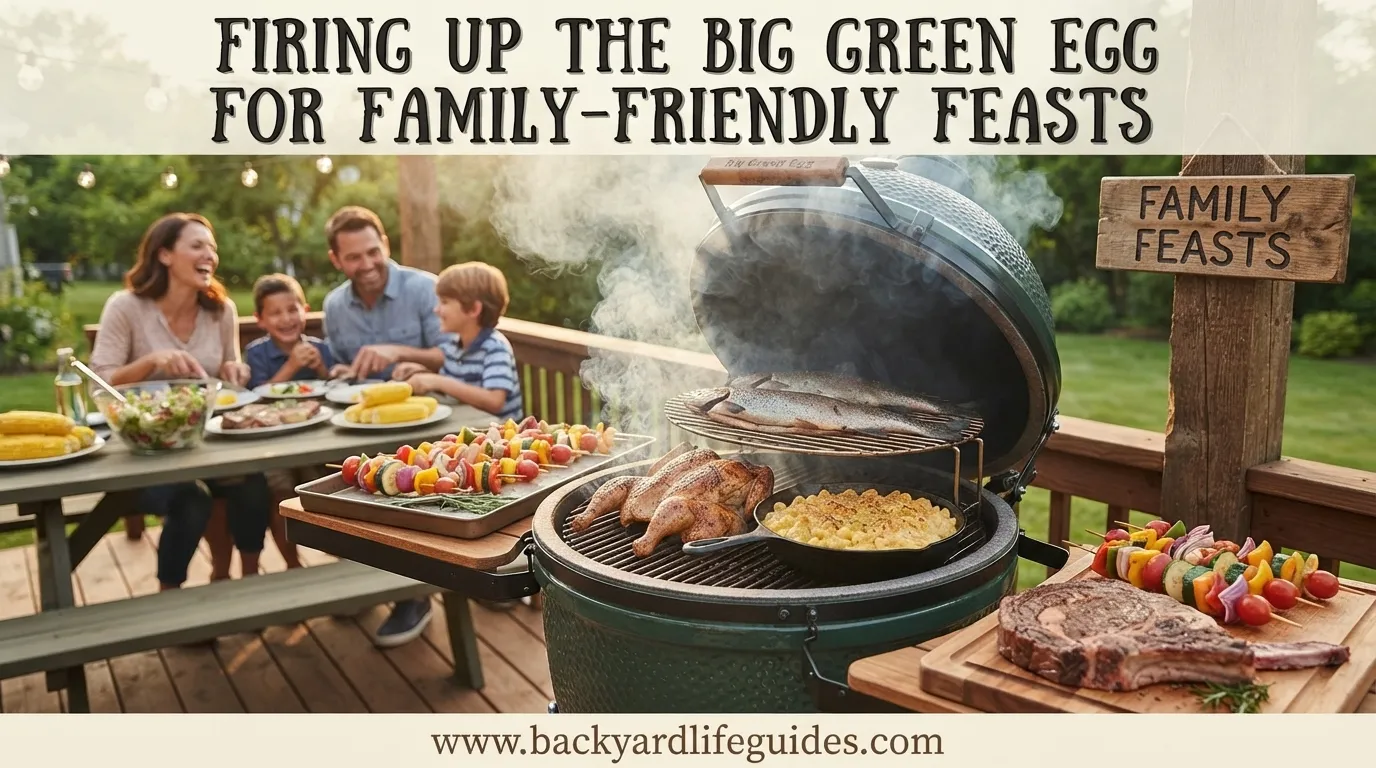
Firing Up the Big Green Egg for Family-Friendly Feasts: A Beginner’s Guide
- Disclosure: This post may include affiliate links. If you click a link and complete a purchase, I may earn a commission. Additionally, as an Amazon Associate, I earn from eligible purchases.
Firing up a Big Green Egg can seem intimidating the first time, especially when you are dealing with lump charcoal, adjustable vents, high temperatures, and a ceramic cooker that holds heat extremely well. The good news is that the basic process is straightforward once you understand how the airflow works. Whether you want to cook burgers for the family, roast chicken, make pizza, or eventually tackle a long brisket, getting the fire started correctly is the foundation for everything that follows.
The Big Green Egg works differently from a basic charcoal grill because you control the fire primarily by managing airflow. Once the charcoal is burning and the temperature begins approaching your target, small adjustments to the upper and lower vents can make a significant difference. A little preparation also makes the cooking process safer and easier.
What You Need Before Lighting the Big Green Egg
Before starting, make sure the Egg is properly assembled and ready for cooking. If your model has a ceramic lid that needs to be replaced with the dual-purpose metal top, make that adjustment first. Open the dome and remove the stainless-steel cooking grate so you can access the charcoal area.
For fuel, natural lump charcoal is the preferred choice. Big Green Egg natural lump charcoal is specifically recommended, while other hardwood or natural lump charcoal can also work. Charcoal briquettes are best avoided because they can produce more ash and may contain additives or adhesives that can affect the cooking environment and flavor.
Fill the firebox with lump charcoal to approximately the top of the fire ring. Another practical approach described by experienced Big Green Egg users is filling the cooker to just above the lower air holes. The exact amount depends on the cooking temperature and duration you need, but the important point is to have enough charcoal for the intended cook.
Open the Vents Before Lighting
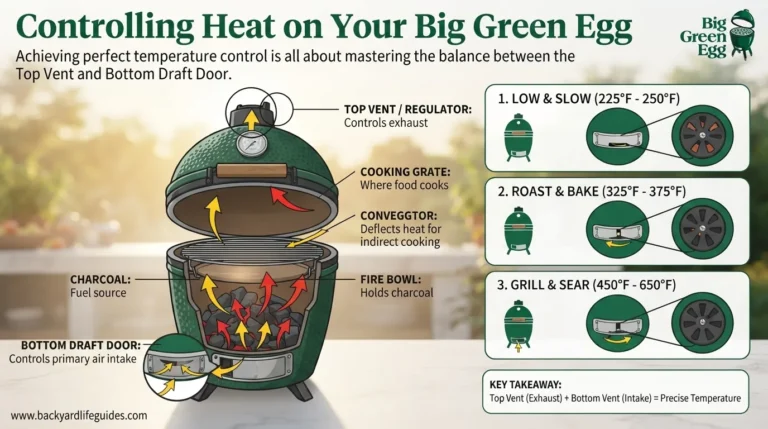
Airflow is what controls the fire inside the Big Green Egg, so both vents should be open when you begin.
Open the lower draft door and open the top vent or dual-function top cap. This allows plenty of oxygen to reach the charcoal while the fire is getting established. At this stage, you want the Egg to heat up freely rather than restricting the airflow too early.
The lower vent is mainly useful for larger temperature adjustments, while the upper vent gives you more precise control once the Egg is getting close to your desired cooking temperature.
How to Light the Lump Charcoal
There are several ways to start lump charcoal, but two practical methods highlighted in the material are a natural charcoal starter and an electric charcoal starter.
With a natural starter, place 1 or 2 pieces among the charcoal and light them. Allow the starter to establish the fire before closing the dome. The charcoal should begin developing a strong glow before you move on to temperature control.
An electric charcoal starter works differently. Plug it in and position the heating coil among the charcoal. Wait until the charcoal develops a visible red glow, then remove and unplug the starter before replacing the cooking grate and closing the dome.
A separate hands-on approach uses a firestarter in the center of the charcoal, places a small amount of charcoal over the flame, and allows it to burn for approximately 7 minutes. Whichever method you use, the objective is the same: establish a reliable fire without introducing unwanted chemicals into the ceramic cooker.
Why You Should Never Use Lighter Fluid
Do not use lighter fluid to start a Big Green Egg.
The ceramic construction is porous, meaning liquid lighter fluid can be absorbed into the material. This can potentially leave unwanted chemical flavors behind. The guidance also warns that using lighter fluid may affect the Big Green Egg warranty.
Natural fire starters or an electric charcoal starter provide a much better approach because they ignite the lump charcoal without soaking the ceramic cooker in combustible liquid.
Bringing the Egg Up to Temperature
Once the charcoal is burning, close the dome and watch the temperature gauge. The Big Green Egg has a dedicated heat gauge, but the temperature at the cooking grate can differ from the reading higher up near the dome.
As the temperature approaches your target, begin restricting the airflow. One practical guideline is to start making adjustments when the Egg is around 10–15°F away from the desired temperature. Closing the vents too late can allow the cooker to overshoot your target, while making large adjustments too early can make temperature control unnecessarily difficult.
Keep in mind that the Egg responds to airflow changes gradually. Avoid constantly opening the dome or making large vent movements. Give the cooker time to respond before deciding whether another adjustment is necessary.
Understanding Big Green Egg Temperature Control
The easiest way to understand temperature control is to think of the vents as the fire’s oxygen supply.
More airflow generally means more oxygen reaches the charcoal, causing the fire to burn hotter. Reducing airflow limits oxygen and brings the temperature down. The lower draft door is useful for larger changes, while the top vent allows finer adjustments.
Once the cooker is close to your target temperature, both vents may need to remain only slightly open. The exact position varies according to the temperature you want, the amount of charcoal burning, and environmental conditions, so learning the response of your particular Egg is part of the process.
For longer cooks, a grate-level thermometer can also be useful. One example from the hands-on guidance is the Maverick ET-732 dual-probe thermometer, which can monitor cooking temperature closer to the food. An automatic temperature controller such as Flame Boss can take this further by monitoring the temperature and controlling airflow with a blower.
Choosing the Right Temperature for Your First Cook
You do not need to begin with a complicated low-and-slow barbecue project. In fact, simple food is a better way to become comfortable with your Egg.
Burgers, sausages, and meat-on-sticks are good beginner choices because they require less complicated temperature management than large cuts such as brisket or prime rib roast. Starting with simple food allows you to learn how quickly your Egg heats up, how the vents respond, and how the temperature behaves after the lid is opened.
Once you are comfortable controlling the fire, you can move toward more advanced cooking techniques such as indirect roasting, smoking, searing, and multi-dish cooking.
How to Set Up the Egg for Indirect Cooking
For indirect cooking, a plate setter or convEGGtor is positioned between the charcoal and the cooking grate. Its purpose is to redirect the heat so food is cooked without sitting directly above the flames.
This setup is especially useful for roasting and low-and-slow cooking. The EGGspander system can take the concept further by creating different cooking zones inside the same Egg.
A particularly useful setup uses dual-zone cooking, with one side providing direct heat and the other side providing indirect heat. A convEGGtor is positioned beneath the indirect side. With the Egg at approximately 400°F / 200°C, different foods can be cooked using different heat zones during the same meal.
Making a Full Meal on One Big Green Egg
The dual-zone approach demonstrates one of the biggest advantages of the Big Green Egg: you can prepare several parts of a meal without needing separate grills.
For example, crisped fingerling potatoes can be cooked indirectly on the top tier for approximately 30 minutes at 400°F / 200°C. The potatoes are cut into ¼-inch coins and combined with ¼ cup olive oil, 2 tablespoons sumac, 1½ tablespoons kosher salt, and 2 teaspoons paprika. Stirring them every 5 minutes helps them cook evenly.
Eggplant can use both cooking zones. A large eggplant can be sliced into ¼-inch rounds, seared directly for approximately 2 minutes per side, and then moved to indirect heat for another 8–10 minutes. The herb butter includes ½ cup butter, 4 tablespoons tarragon, 4 tablespoons dill, 1 tablespoon rosemary, 1 tablespoon coriander, 1 tablespoon paprika, and 1 tablespoon kosher salt.
A side of salmon can also be cooked directly at 400°F / 200°C. A 2–3 lb side can be divided into 4-inch-wide fillets, brushed with 2 tablespoons olive oil and lemon juice, then seasoned with sumac, paprika, kosher salt, coriander, garlic powder, and onion powder. Skin-side down, the salmon generally takes about 8–10 minutes, depending on thickness and desired doneness.
This kind of setup makes the Big Green Egg particularly useful for family meals because multiple components can be prepared using different heat zones instead of cooking everything separately.
Don’t Forget to Burp the Egg
One of the most important safety habits when using a hot Big Green Egg is learning how to prevent a flashback.
When the dome has been closed while charcoal is burning, the cooking chamber can contain very hot gases. Opening the dome suddenly can allow oxygen to enter quickly and potentially create a flashback.
The recommended technique is to burp the Egg before opening it completely. Crack the dome open approximately 1–2 inches, close it, and repeat this a few times. Then open the dome fully.
This small habit is particularly important when the Egg is extremely hot. Never rush the process simply because you want to check the food.
Try Different Foods as You Gain Confidence
Once you understand the basic fire and temperature controls, the Big Green Egg becomes much more versatile.
For a relaxed family gathering, low-and-slow ribs can be cooked indirectly with wood chunks and barbecue seasoning. Baby back ribs and St. Louis-style ribs are both suitable options.
For burgers, a cast iron plancha can provide the intense surface heat needed for a strong crust. Smash burgers can then be finished with melted cheddar and served on toasted buns.
A spatchcock chicken is another useful step up from basic grilling. Flattening the whole chicken helps it cook more evenly while indirect roasting provides a controlled environment.
Vegetables such as asparagus, zucchini, and corn on the cob can be cooked directly over the fire. The ceramic Egg’s heat retention helps create a deeply roasted character without requiring complicated preparation.
How Hot Can You Cook Pizza on a Big Green Egg?
Pizza is one of the higher-temperature uses for the Big Green Egg. The guidance recommends using a baking stone and preheating the Egg to approximately 600°F.
At that temperature, homemade or store-bought dough can cook in just a few minutes, making pizza a useful option when feeding several people. Because the cooking temperature is significantly higher than the 400°F / 200°C used for the multi-dish meal setup, careful temperature management becomes even more important.
Grilled Desserts Can Finish the Meal
The Big Green Egg does not have to stop at the main course. Peaches and pineapple can be grilled to create a simple smoky dessert.
A little cinnamon and sugar can enhance the fruit, while ice cream provides a cool contrast to the warm grilled fruit. This is an easy way to finish a family meal without introducing another complicated recipe.
Using the Egg for Long Cooks
Once you move into smoking, maintaining a steady temperature becomes more important than achieving a quick high heat.
A temperature controller such as Flame Boss can monitor the cooker and automatically operate a blower connected to the lower intake. In the hands-on example, the controller is set to 225°F and is described as capable of maintaining that temperature effectively.
With enough charcoal, this type of setup can support cooking sessions lasting 12–14+ hours, making it useful for briskets, pork shoulders, and overnight cooks.
The important lesson for beginners is not to start with an overnight cook. Learn how your Egg behaves during shorter sessions first, then gradually increase the cooking time as your confidence grows.
What to Do When Cooking Is Finished
When the food is finished, temperature control becomes a matter of cutting off airflow.
Close the lower draft door and replace the ceramic damper lid as appropriate for your setup. Restricting the oxygen supply causes the fire to die down and allows the Egg to cool.
Because the ceramic cooker retains heat extremely well, do not assume that closing the vents will make the Egg immediately cold. Give it plenty of time to cool naturally before handling components or attempting to clean it.
Common Beginner Mistakes to Avoid
The biggest mistake is treating the Big Green Egg like an ordinary open charcoal grill. It is a highly insulated ceramic cooker, so changes in airflow can have a significant effect on temperature.
Avoid adding lighter fluid, opening the dome repeatedly, or making large vent adjustments without allowing the cooker time to respond. Do not begin your first cook with an expensive brisket or prime rib if you have never controlled the Egg before.
It is much better to spend a few early cooks learning with burgers, sausages, or other straightforward foods. You will quickly learn how your Egg responds to lighting, airflow, lid openings, and temperature adjustments.
A Simple First-Cook Routine
For a first family cook, start by filling the Egg with natural lump charcoal and opening both vents. Light the charcoal with a natural starter or electric starter and allow the fire to establish itself.
As the temperature rises, close the dome and monitor the gauge. When the temperature gets within approximately 10–15°F of your target, begin making smaller vent adjustments.
For a beginner-friendly cook, aim for a moderate grilling temperature rather than immediately attempting an overnight smoke or extremely high-temperature pizza. Burgers, sausages, or simple vegetables let you concentrate on learning the cooker rather than managing a complicated recipe.
Before opening a very hot Egg, always burp the dome by opening it approximately 1–2 inches a few times. After cooking, close the vents to restrict oxygen and allow the cooker to cool.
FAQs
What charcoal should I use in a Big Green Egg?
Natural lump charcoal is the preferred fuel described in the guidance. Big Green Egg natural lump charcoal or other hardwood lump charcoal can be used. Charcoal briquettes are generally avoided because they produce more ash and may contain additives.
Can I use lighter fluid in a Big Green Egg?
No. Lighter fluid should not be used. The ceramic material is porous and can absorb the fluid, potentially creating unwanted chemical flavors and potentially affecting the warranty.
How do I prevent a Big Green Egg flashback?
Burp the Egg before opening the dome completely. Open it approximately 1–2 inches, close it, and repeat the process a few times before opening it fully. This allows oxygen to enter gradually.
What temperature is good for a beginner?
A moderate cooking temperature is easier for learning temperature control than immediately attempting very high heat or an overnight smoke. The multi-dish EGGspander example uses 400°F / 200°C, while a Flame Boss smoking example uses 225°F.
How long does it take to light a Big Green Egg?
One hands-on method described uses a firestarter and allows it to burn for approximately 7 minutes. Actual warm-up time depends on the charcoal, airflow, weather, and cooking temperature you are trying to reach.
Can I cook multiple foods at the same time?
Yes. An EGGspander setup can create different cooking zones, allowing direct and indirect cooking simultaneously. A 400°F / 200°C dual-zone setup can be used for dishes such as potatoes, eggplant, and salmon.
Can a Big Green Egg maintain a low temperature for a long time?
Yes. With enough charcoal and appropriate temperature control, a Big Green Egg can support long cooking sessions. A temperature-controller example demonstrates 225°F cooking and reports 12–14+ hours of potential cooking duration.
Final Thoughts
Firing up a Big Green Egg becomes much easier once you stop thinking of it simply as a charcoal grill and start thinking of it as an airflow-controlled cooker. Use natural lump charcoal, keep lighter fluid away from the ceramic, open the vents when starting, and make smaller adjustments as you approach your target temperature.
For your first few cooks, keep things simple with burgers, sausages, vegetables, or similar foods. Once you understand how the vents affect temperature, you can move into dual-zone meals, pizza at 600°F, low-and-slow cooking at 225°F, and long cooks lasting 12–14+ hours. Most importantly, develop the habit of burping the Egg by opening the dome 1–2 inches before fully opening it. A controlled fire, patient temperature management, and safe handling will make the Big Green Egg far more enjoyable for family meals.
3 Comments