Balancing Heat for Smoking and Grilling Meats on a Charcoal Cooker
- Disclosure: This post may include affiliate links. If you click a link and complete a purchase, I may earn a commission. Additionally, as an Amazon Associate, I earn from eligible purchases.
Charcoal cooking becomes much easier when you stop thinking only about how much charcoal to use and start paying attention to heat placement, airflow, and temperature.
A charcoal cooker can produce intense direct heat for searing steaks or gentle indirect heat for smoking brisket, ribs, chicken, and other foods. The challenge is keeping that heat stable long enough for the food to cook evenly.
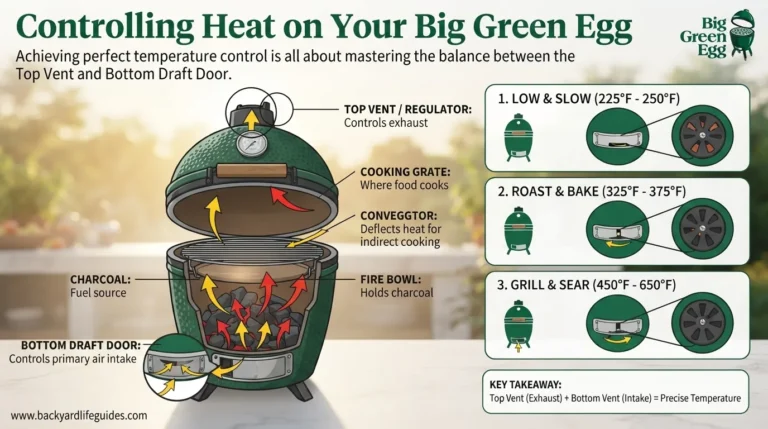
The most useful principle is simple: charcoal needs oxygen. Opening the vents allows more oxygen to reach the fire and generally raises the temperature. Restricting airflow lowers the heat.
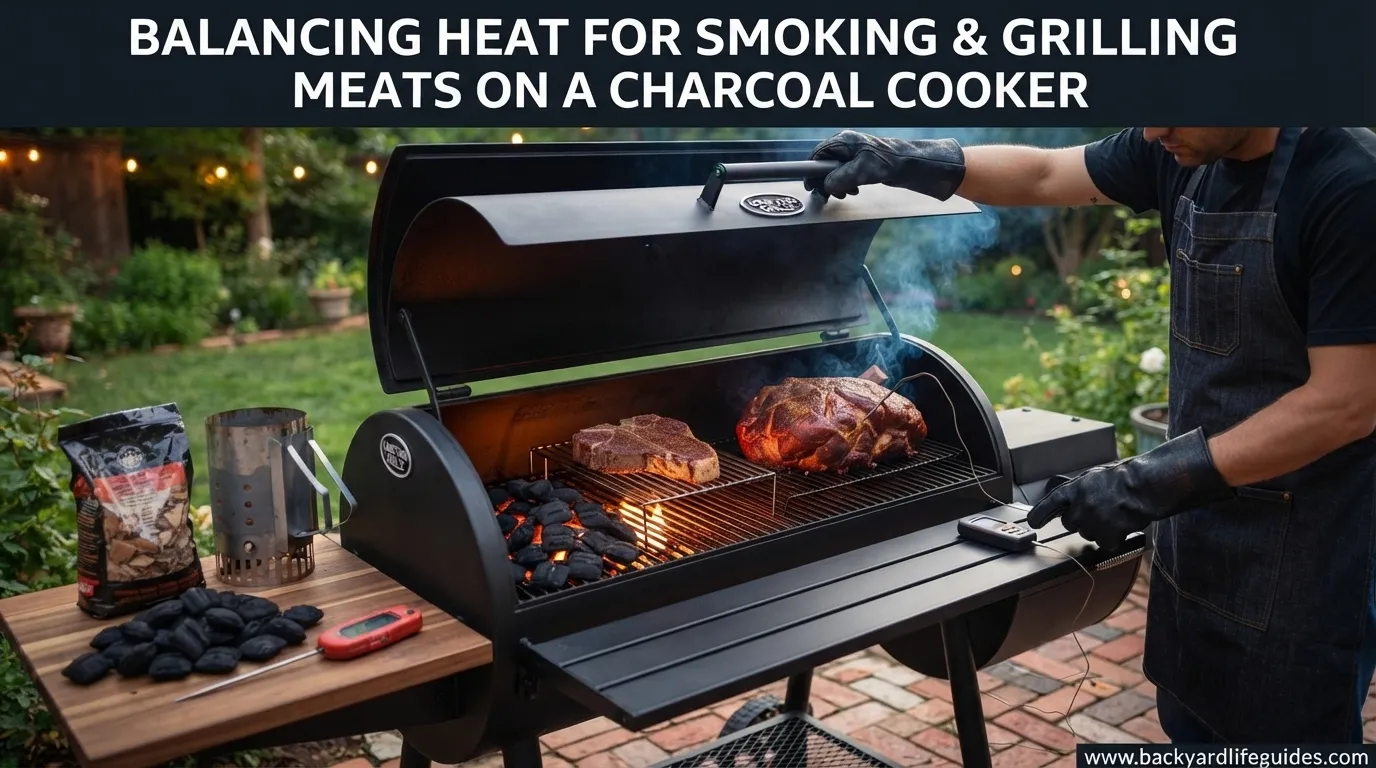
For smoking, a 2-zone setup is especially useful. Hot coals stay on one side while the meat cooks on the cooler side. This separates the food from direct flames and creates the low-and-slow environment needed for smoking.
How Charcoal Vents Control Temperature
Your grill’s vents work like an air-control system.
The bottom intake vent controls how much oxygen reaches the charcoal. The top exhaust vent allows smoke and hot air to leave the cooker.
Opening the vents
More airflow gives the charcoal more oxygen. This makes the fire burn faster and can raise the cooking temperature.
Closing the vents
Reducing airflow slows the charcoal and can bring the temperature down.
However, avoid completely closing the exhaust during a smoke. The supplied BBQ Report guide recommends keeping the top exhaust at least partially open so smoke can move through the cooker instead of becoming trapped. For many smoking sessions around 225–250°F, it gives an exhaust opening range of approximately 1/4 to 1/2.
Make small adjustments
One of the most useful temperature-control techniques is to avoid making large vent changes.
Check the grate temperature every 30–45 minutes, adjust the bottom vent by roughly 1/4 inch, and wait 10–15 minutes before making another adjustment.
This gives the charcoal time to respond instead of causing repeated temperature swings.
The 2-Zone Setup: The Most Versatile Arrangement
The 2-zone method divides your grill into two cooking areas:
- Direct zone: lit charcoal and higher heat
- Indirect zone: no charcoal directly underneath the food
This arrangement is useful because you can move food between the zones as it cooks.
For example, a steak can receive intense direct heat for a crust, while chicken or ribs can remain over indirect heat for slower cooking.
How to Build a 2-Zone Fire
- Light your charcoal.
- Allow the coals to become hot and largely covered with ash.
- Push the lit charcoal toward one side.
- Leave the opposite side without charcoal.
- Place a water pan on the indirect side when desired.
- Put the meat above the indirect zone.
- Position the lid so the exhaust vent is above the food.
- Adjust the vents until the desired temperature is stable.
The arrangement allows heat and smoke to travel across the food instead of exposing it directly to the charcoal.
Direct Heat for Fast Grilling
Direct heat is the simplest charcoal configuration.
The coals are arranged in an even layer underneath the food, producing strong heat directly below the cooking grate.
The Mountain Kitchen places direct heat around 450–550°F and recommends it for foods that cook relatively quickly, including steaks, chicken, hamburgers, fish, and vegetables.
When direct heat works best
Use it when you want:
- A quick sear
- A browned exterior
- Charred edges
- Fast cooking
- Strong direct charcoal heat
The main disadvantage is that intense heat can overcook or burn food quickly. Thick cuts and whole chickens are generally better suited to indirect cooking before finishing over direct heat.
The Snake Method for Longer Cooks
The Snake Method arranges charcoal around the edge of the grill in a continuous line.
Only one end is lit. As the fire moves through the charcoal, it creates a gradual source of heat rather than burning the entire fuel supply at once.
The Mountain Kitchen describes a typical temperature range of 225–250°F and reports that its setup can run for approximately 2 to 2.5 hours without attention. BBQ Report describes longer Snake Method burns of approximately 4–6 hours, depending on the setup.
Snake Method setup
- Arrange briquettes around the edge of the grill.
- Create a continuous line of touching charcoal.
- Add wood chunks along the charcoal path.
- Light one end.
- Position the food away from the active fire.
- Close the lid.
- Adjust the vents for approximately 225–250°F.
This approach is particularly useful for brisket, pork shoulder, ribs, whole chicken, fish, and sausage.
The Minion Method for Extended Smoking
The Minion Method is another way to create a longer-lasting charcoal fire.
Instead of lighting all the charcoal at once, a smaller quantity of lit charcoal starts the combustion process while surrounding unlit charcoal gradually catches.
BBQ Report describes approximately 10–15 lit briquettes as an initial amount and gives a typical burn duration of 6–8 hours for this style of setup.
This makes it useful for larger cuts that require extended cooking.
Three-Zone Split Fire for Large Foods
The Three-Zone Split Fire uses two charcoal piles on opposite sides of the grill.
The center remains empty, creating an indirect cooking zone.
This arrangement gives you:
- Direct heat on one side
- Indirect heat in the middle
- Direct heat on the opposite side
The Mountain Kitchen recommends approximately 250–350°F for this configuration and describes it as useful for roasts, whole chickens, turkeys, large briskets, pork shoulders, and rotisserie cooking.
Adding a water pan
A water pan can be placed between the charcoal piles.
It can help stabilize the cooking environment and collect drippings. For a split-fire setup, the supplied source recommends filling the pan approximately halfway with water.
Bulls-Eye and Vortex Setup
Another arrangement places charcoal in the center of the cooking grate.
This produces a concentrated direct-heat area above the charcoal while leaving the outer portion of the grill more suitable for indirect cooking.
The Mountain Kitchen discusses using a Vortex with this configuration to create intense convection and crisp chicken wings.
This is particularly useful when you want strong heat in a relatively small area without covering the entire grate with charcoal.
How to Manage Smoke Without Over-Smoking the Meat
Temperature is only half of charcoal smoking. Smoke quality also matters.
During the first 15–20 minutes, thicker white smoke can appear as wood begins burning. The supplied BBQ Report guide recommends waiting for this to transition toward thin blue smoke before putting the food on the grill.
What thin blue smoke means
Thin blue smoke is:
- Wispy
- Light
- Less visible
- Cleaner smelling
Heavy white smoke can create harsh flavors when the food is exposed to it for extended periods.
If thick smoke develops during the cook, the problem can be insufficient airflow. A small increase in the bottom vent can help restore combustion.
Wood Chips vs. Wood Chunks
Your choice of smoking wood should match the length of the cook.
| Smoking wood | Suggested use |
|---|---|
| Wood chips | Shorter smoking sessions |
| Wood chunks | Longer smoking sessions |
| Soaked chips | Approximately 30 minutes before use |
BBQ Report recommends chunks for longer cooks of 3+ hours and chips for shorter sessions. It also notes that soaked chips can burn more slowly. American Meathead’s supplied material similarly recommends soaking wood chips for at least 30 minutes while using chunks dry.
Cooking Temperatures and Times for Meat
The following table brings together the meat-specific numbers found in the supplied.
| Food | Cooking temperature | Approx. cooking time |
|---|---|---|
| Shellfish | 430°F | 13 min |
| Côte de boeuf | 450–480°F | 16–20 min |
| Rib-eye | 430°F | 5–10 min |
| Lamb chops | 430°F | 5–10 min |
| Chicken, indirect | 360°F | 75–90 min |
| Lamb’s leg | 250°F | 1.5 hr |
| Rump steak, indirect | 250°F | 75–90 min |
| Rump steak, smoked | 194°F | 1.5 hr |
| Pork neck, smoked | 194°F | 8–9 hr |
| Salmon | 194°F | 20–25 min |
These figures illustrate an important point: cooking temperature and cooking time must be considered together. A thin steak and a large pork cut cannot be treated with the same heat strategy.
Internal Temperature Matters More Than the Clock
Cooking time is useful for planning, but internal temperature provides a better indication of doneness.
The supplied gives the following steak guide:
| Steak doneness | Internal temperature | Approx. grilling time |
|---|---|---|
| Extra rare | 125–130°F | 1 min/side |
| Rare | 125–130°F | 1.5 min/side |
| Medium rare | 130–140°F | 2 min 15 sec/side |
| Medium | 140–150°F | 2 min 15 sec/side |
| Medium well | 150–155°F | 3–4 min/side |
| Well done | 160°F+ | 4–5 min/side |
Use the thermometer as the final reference rather than assuming that every piece of meat will reach its target temperature at exactly the same time.
Common Smoking Temperature Targets
For low-and-slow charcoal cooking, the supplied guides repeatedly center around 225–250°F, while BBQ Report uses a broader 225–275°F range for charcoal smoking.
| Meat | Approx. smoker temperature | Target internal temperature |
|---|---|---|
| Beef brisket | 225–250°F | 195–205°F |
| Pork shoulder | 225–250°F | 195–205°F |
| Spare ribs | 225–250°F | 190–203°F |
| Baby back ribs | 225–250°F | 190–203°F |
| Whole chicken | 250–275°F | 165°F |
| Turkey | 240–275°F | 165°F |
| Sausage | 225–250°F | 160°F |
| Salmon | 200–225°F | 145°F |
These numbers are useful as a planning reference, while the exact cooking time can vary with meat thickness, starting temperature, grill design, weather, and fire behavior.
How Long Should You Expect to Smoke Meat?
Some of the supplied sources give approximate time-per-pound guidance:
| Meat | Approximate time |
|---|---|
| Brisket | 1–1.5 hr/lb |
| Pork shoulder | 1.5–2 hr/lb |
| Baby back ribs | 4–5 hr |
| Spare ribs | 5–6 hr |
| Whole chicken | 3–4 hr |
| Turkey | 30–40 min/lb |
| Sausage | 1.5–2 hr |
These estimates are useful for scheduling, but they should not replace temperature checks. Two pieces of the same weight can finish at different times because of shape, thickness, airflow, and cooker temperature.
Don’t Keep Opening the Lid
One of the easiest ways to lose temperature control is repeatedly lifting the lid.
BBQ Report estimates that opening the lid can release approximately 15–25°F of accumulated heat. Repeated opening can therefore extend cooking time and make temperature management more difficult.
Instead:
- Use a thermometer.
- Make small vent adjustments.
- Check temperature at planned intervals.
- Open the lid only when necessary.
- Avoid constantly moving the meat.
If you are looking, you are not cooking is a useful rule for long charcoal cooks.
Charcoal Type Makes a Difference
The supplied distinguishes between two common fuel types.
Lump charcoal
Lump charcoal generally burns hotter and can be useful when high heat is needed, such as reverse searing.
Briquettes
Briquettes tend to provide a more consistent and predictable burn, making them useful for longer low-and-slow cooking.
The Mountain Kitchen specifically notes the hotter behavior of lump charcoal and favors briquettes for consistent long cooks.
When Should You Add More Charcoal?
Long cooks eventually require additional fuel.
The exact timing depends on the charcoal arrangement, grill size, weather, vent settings, and cooking temperature.
The Mountain Kitchen notes that in its experience additional charcoal is required during low-and-slow cooking 95% of the time.
The goal is not to wait until the grill becomes cold. Add fuel while there is still enough heat to ignite the new charcoal efficiently.
A Simple Temperature-Control Routine
For beginners, this routine keeps the process manageable.
Before cooking
- Clean the cooking grate.
- Check that vents can move freely.
- Prepare your charcoal arrangement.
- Prepare your wood.
- Have a thermometer ready.
- Set up the water pan if using one.
During startup
- Light the charcoal.
- Allow the coals to become properly heated.
- Watch the initial smoke.
- Adjust the vents gradually.
- Wait for the cooking temperature to stabilize.
During smoking
- Aim around 225–250°F for traditional low-and-slow cooking.
- Check the grate temperature every 30–45 minutes.
- Adjust the bottom vent in approximately 1/4-inch increments.
- Wait 10–15 minutes between adjustments.
- Keep the exhaust vent partially open.
- Avoid unnecessary lid opening.
- Monitor internal meat temperature.
This approach combines the most practical temperature-management techniques presented across the supplied.
Charcoal Smoking Safety
Temperature control is also a food-safety issue.
BBQ Report highlights the 4-hour rule, stating that meat should reach 140°F within 4 hours and identifying 40–140°F as the danger zone where harmful bacteria can multiply rapidly.
For a safe cooking routine:
- Start with properly thawed meat.
- Monitor internal temperature.
- Avoid allowing meat to remain in the danger zone for extended periods.
- Keep raw and cooked foods separated.
- Use a clean thermometer.
- Do not rely only on cooking time.
Troubleshooting Common Charcoal Temperature Problems
The grill is too hot
Try:
- Closing the intake vent slightly.
- Checking for excessive lit charcoal.
- Moving food to the indirect zone.
- Waiting before making another adjustment.
Do not make several large vent changes at once.
The grill is too cool
Try:
- Opening the intake vent slightly.
- Checking whether the charcoal has sufficient airflow.
- Ensuring the exhaust is not closed.
- Adding charcoal when the existing fuel is running low.
The smoke is thick and white
The fire may be smoldering.
Improve airflow gradually and allow the smoke to transition toward a cleaner, thinner appearance before continuing the cook.
The outside is burning but the center is not done
Move the meat to the indirect zone and reduce the intensity of the direct heat.
This is one of the main advantages of a 2-zone charcoal setup.
The temperature keeps jumping
Check:
- Vent position
- Lid opening frequency
- Charcoal quantity
- Wind exposure
- Fuel arrangement
- Thermometer position
Make only one adjustment at a time so you can see what actually changed the cooker.
Quick Reference: Which Charcoal Setup Should You Use?
| Your goal | Recommended setup | Temperature |
|---|---|---|
| Fast searing | Direct heat | 450–550°F |
| General grilling | 2-zone | 350–450°F |
| Thick cuts | 2-zone | 350°F or lower |
| Reverse searing | 2-zone | Start low, finish hot |
| Ribs | Snake / 2-zone | 225–250°F |
| Brisket | Snake / Minion | 225–250°F |
| Pork shoulder | Snake / Minion | 225–250°F |
| Whole chicken | 2-zone / 3-zone | 250–275°F |
| Large roast | 3-zone | 250–350°F |
| Long smoking | Snake / Minion | 225–250°F |
| Crispy wings | Bulls-Eye / Vortex | High heat |
The correct setup depends more on how you want heat distributed than simply how much charcoal is inside the grill.
Frequently Asked Questions
What temperature is best for smoking meat on a charcoal grill?
A common low-and-slow target is 225–250°F. Some charcoal smoking guides use a broader range up to 275°F, depending on the meat and setup.
How do you control temperature on a charcoal cooker?
Control temperature primarily through airflow. Use the bottom intake vent to regulate oxygen reaching the charcoal and keep the top exhaust sufficiently open for smoke and heat to escape.
What is the best charcoal setup for smoking?
A 2-zone setup is one of the most versatile choices. For longer unattended burns, the Snake and Minion methods can extend charcoal life while maintaining indirect heat.
How long should charcoal burn before cooking?
It depends on the setup. The Snake Method can provide approximately 2–2.5 hours in one setup and 4–6 hours in another, while a Minion setup can provide approximately 6–8 hours.
Should the top vent be open when smoking?
Yes. The supplied BBQ Report guide recommends keeping the exhaust vent at least partially open. For many smoking sessions around 225–250°F, it gives approximately 1/4–1/2 open as a starting range.
How often should you check the grill temperature?
A practical interval is every 30–45 minutes. If an adjustment is needed, make a small change and wait approximately 10–15 minutes before changing the vents again.
Should I use lump charcoal or briquettes for smoking?
Briquettes are useful when you want a more consistent, predictable burn for long cooks. Lump charcoal can burn hotter and is useful when high heat is needed.
How can I prevent thick white smoke?
Give the charcoal and wood enough airflow and wait for the initial heavy smoke to transition toward thin blue smoke. The supplied BBQ Report guide notes that thick white smoke during the first 15–20 minutes can occur while wood initially ignites.
How much heat do I lose when opening the grill?
BBQ Report estimates that opening the lid can release approximately 15–25°F of accumulated heat. Keeping the lid closed as much as possible helps maintain a stable cooking environment.
What is the 4-hour rule for smoking meat?
The supplied BBQ Report guide describes the 4-hour rule as keeping meat from remaining in the 40–140°F danger zone too long and recommends reaching 140°F within 4 hours.
Final Takeaway
Successful charcoal cooking is less about constantly adding fuel and more about controlling the fire you already have.
Start by choosing the right charcoal arrangement. Use direct heat for fast searing, a 2-zone fire for flexibility, the Snake or Minion Method for longer smoking, and a Three-Zone Split Fire when you need balanced indirect heat around a large cut.
Then control the fire with airflow. Make small vent changes, give the charcoal 10–15 minutes to respond, monitor the grate every 30–45 minutes, and keep the lid closed whenever possible.
For low-and-slow cooking, 225–250°F is a useful target range, while internal temperature should guide doneness rather than the clock alone.
Once you understand the relationship between charcoal, oxygen, vents, heat zones, smoke, and internal temperature, a basic charcoal cooker becomes much more versatile. You can move from a quick 450–550°F sear to a controlled low-and-slow cook without needing a separate smoker.