
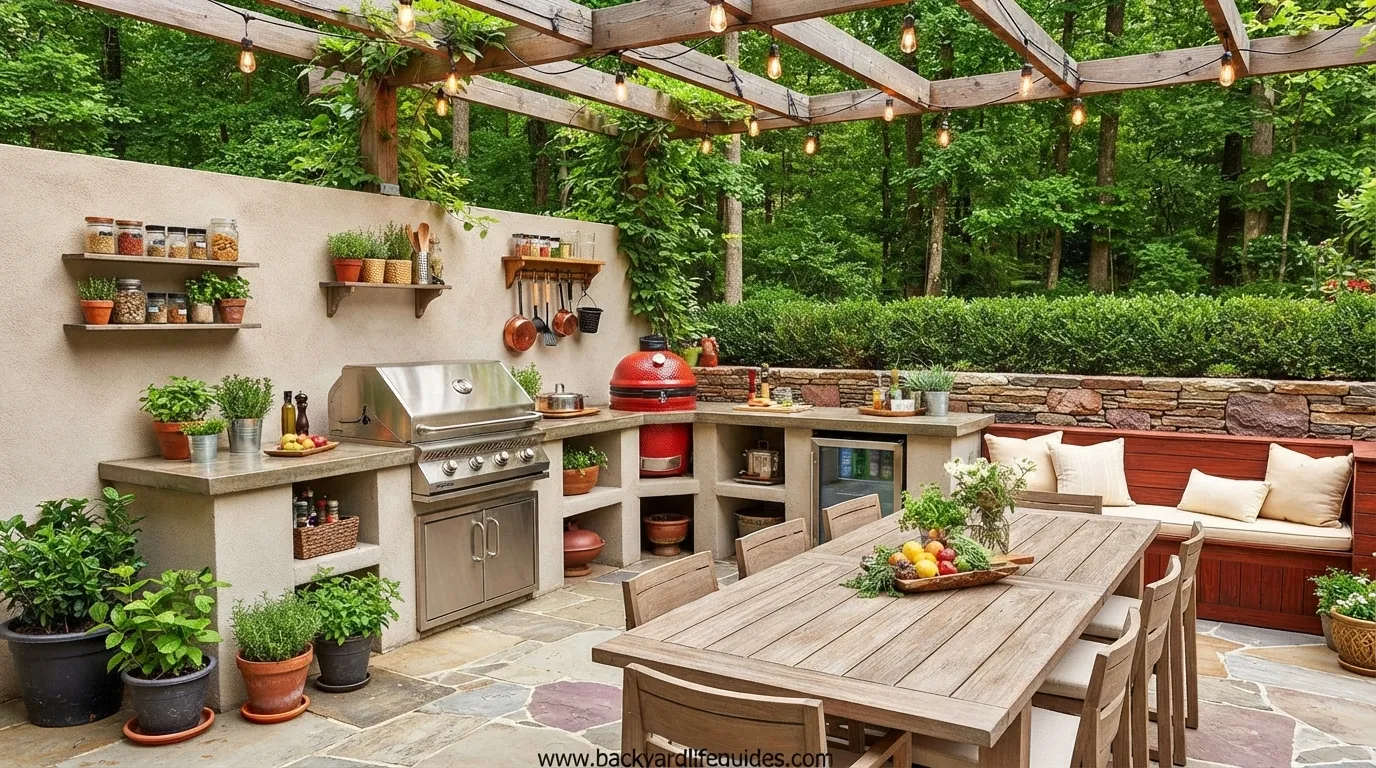
25 Ideas to Maximize Your Outdoor Cooking Space
- Disclosure: This post may include affiliate links. If you click a link and complete a purchase, I may earn a commission. Additionally, as an Amazon Associate, I earn from eligible purchases.
An outdoor cooking area does not need to take over your backyard to be useful. With the right layout, even a compact garden can accommodate a grill, preparation area, storage, seating, and lighting without feeling crowded.
The best outdoor cooking spaces are designed around how you actually use them. A grill should be easy to reach, preparation space should be close enough to avoid unnecessary movement, and frequently used utensils should remain within arm’s reach. Storage should also have a clear purpose rather than becoming a place where miscellaneous outdoor items accumulate.
Whether you are working with a small patio, a narrow garden, a raised deck, or a larger backyard, the ideas below focus on making every part of the available space work harder.
Start With the Cooking Area
Before buying furniture or installing cabinets, consider how much room your grill and cooking equipment really need. A common mistake is designing the entire area around the grill and then discovering that there is not enough space for preparation or serving.
For a compact garden, a portable grill can be a practical starting point. Some portable models are approximately 20–24 inches wide, making them easier to position than a large permanent cooking station.
A tabletop grill can also work well when floor space is limited. The cooking surface may be around 200–300 square inches, which can be enough for a small gathering of approximately 4–6 people, depending on the food being prepared.
The goal is not simply to fit the largest grill possible. The better approach is to select equipment that leaves enough room to move safely and comfortably around it.
Use a Compact Built-In BBQ
A built-in BBQ can give a small cooking area a more permanent appearance without requiring a full outdoor kitchen. A compact installation may occupy around 4–6 square feet, with a cooking surface positioned approximately 30–36 inches high.
This height can make preparation more comfortable, but the exact working height should suit the people using the kitchen and the manufacturer’s installation requirements.
For a corner installation, approximately 3–4 feet of wall space on each side can create a useful compact arrangement. A counter can then extend around 12–18 inches beyond the sides of the grill, creating additional space for plates, tools, or ingredients.
Choose a Corner Layout
Corners are often wasted in outdoor spaces. Instead of placing a grill in the middle of the garden, consider an L-shaped or triangular arrangement.
An L-shaped cooking station can place the grill along one side and the preparation surface along another. This keeps the central floor area open for walking, seating, or entertaining.
A corner layout is particularly useful when the garden has limited width because it concentrates the cooking equipment along the perimeter.
Create a Multi-Functional Cooking Station
Small outdoor kitchens benefit from furniture that performs more than one job.
A preparation counter can double as a serving surface. A storage bench can provide seating while hiding cushions, BBQ accessories, or outdoor equipment. A fold-down table can function as a preparation station while cooking and disappear against the wall afterward.
This approach is especially useful when you want an outdoor cooking area without permanently sacrificing valuable garden space.
Add Fold-Down Preparation Space
A fold-down table is one of the simplest ways to create temporary workspace. When you are preparing food, it provides a convenient surface next to the grill. Once cooking is finished, it can be folded away to restore walking space.
The same surface can also become a serving station or small buffet area when entertaining.
For a narrow garden, this can be more practical than installing a large fixed countertop.
Combine Cooking and Seating
Instead of separating cooking, storage, and seating into different pieces of furniture, look for opportunities to combine them.
A sturdy storage bench can provide seating while keeping BBQ accessories, cushions, outdoor toys, gardening tools, or throws hidden underneath. For outdoor use, weather resistance matters because furniture is exposed to sunlight, rain, and seasonal changes.
Features such as UV protection, waterproof finishes, and rust-resistant hardware can help outdoor storage remain useful for longer.
Make Storage Part of the Kitchen
Storage is one of the biggest differences between an outdoor cooking area that feels organized and one that quickly becomes cluttered.
You do not necessarily need a large shed or expensive cabinetry. Storage should be matched to the items you actually use.
Charcoal, firewood, oversized utensils, spices, sauces, cleaning products, plates, and grilling accessories can all require different storage solutions.
Use Bins, Baskets, and Containers
Simple containers can make a surprisingly large difference in a compact cooking area.
Large bins are useful for charcoal, firewood, or bulky cooking equipment. Smaller baskets can keep napkins, spices, and grilling accessories together. Sealed containers can organize oils, sauces, rubs, and cleaning supplies.
Keeping similar items together means you spend less time searching for equipment when cooking.
It also prevents small items from occupying valuable countertop space.
Install Wall Hooks
When floor and counter space are limited, look upward.
Wall hooks can hold frequently used tools such as tongs, spatulas, grill brushes, and thermometers. A pegboard or PVC-based slatwall can provide additional flexibility because hooks and holders can be rearranged as your equipment changes.
For homeowners who prefer a cleaner appearance, cabinet doors or sliding panels can hide equipment when the kitchen is not being used.
Build Integrated Cabinets
Integrated cabinets are a stronger option when you are creating a permanent outdoor cooking area.
Materials such as stainless steel, stone, and marine-grade aluminum can be appropriate for outdoor installations because the kitchen may be exposed to rain, sunlight, and changing weather conditions.
The advantage of custom cabinetry is that it can be designed around the exact dimensions of your grill, counters, appliances, and available wall space.
The important consideration is not simply appearance. Outdoor cabinetry should be selected and installed according to its intended environmental exposure and the manufacturer’s specifications.
Turn an Under-Deck Area Into Storage
The space underneath a raised deck can easily become wasted space. If the elevation and construction allow it, this area can become valuable outdoor storage.
Lockable cabinets, pull-out shelves, and built-in storage bins can transform an otherwise awkward area into an organized extension of the cooking space.
In some layouts, sufficient height may even allow the area to function like a small walk-in pantry.
A storage shed can provide a similar solution when more capacity is required. It can accommodate bulky items such as smokers, unused grills, kitchen equipment, cutting boards, dishes, and outdoor cooking accessories.
One pricing information places storage shed construction at approximately $15–$150 per square foot, depending on quality. Actual costs can vary substantially with materials, labor, foundation requirements, size, and local conditions, so this figure should be treated as a planning reference rather than a fixed price.
Use a Mobile Outdoor Kitchen Cart
An outdoor kitchen cart is useful when you want flexibility instead of permanent construction.
A weather-resistant cart can provide a preparation surface while shelves, drawers, and hooks organize cooking equipment. Wheels allow the cart to move when you need additional space for entertaining or want to protect it from severe weather.
This arrangement is particularly useful for renters or homeowners who are not ready to commit to a built-in outdoor kitchen.
A cart can also serve as a bridge between a simple BBQ setup and a more complete outdoor kitchen.
Use Vertical Space Instead of Floor Space
One of the most effective strategies for a small garden is to build upward rather than outward.
Wall-mounted grills, fence-mounted accessories, vertical storage, hanging tools, tiered preparation surfaces, and wall-mounted herb gardens can provide functionality without consuming much floor area.
A tiered cooking arrangement can separate grilling, preparation, and serving into different levels.
This is useful when the available ground area is narrow but the surrounding walls or fencing provide usable vertical surfaces.
Add a Vertical Herb Garden
A herb garden can become both a practical cooking feature and a decorative element.
Basil, rosemary, and thyme are examples of herbs that can be incorporated into a small outdoor cooking environment. Fence-mounted planters, vertical boxes, and wall systems can keep them close to the cooking area without requiring a traditional garden bed.
Tall plants, shrubs, trellises, and climbing vines can also contribute to privacy and natural screening.
Use Existing Patio Space
You do not always need to build a new foundation for an outdoor BBQ area.
An existing concrete or stone patio can provide a ready-made base for a cooking station. Reusing the surface can reduce construction work and preserve more of the garden.
Outdoor rugs, folding chairs, modular furniture, and storage stools can then define the cooking and entertaining areas without permanent walls.
This approach works especially well when the existing patio already sits near the house and provides convenient access to the indoor kitchen.
Try a Budget-Friendly DIY Approach
A small outdoor cooking area does not automatically require a large construction budget.
One suggests approximately $200–$500 as a starting budget for a budget-friendly small garden BBQ area using DIY methods. The actual amount will depend on the grill, materials, furniture, utilities, and whether professional installation is required.
If the budget is limited, prioritize the elements that directly affect cooking: the grill, a stable preparation surface, and basic seating.
Existing garden benches, old tables, reclaimed bricks, reclaimed stone, gravel, mulch, pallets, and suitable scrap materials may be repurposed where appropriate.
The important distinction is between reuse and unsafe improvisation. Materials exposed to heat, food, moisture, or structural loads should be suitable for those conditions.
Create Separate Cooking and Relaxation Zones
Even a small backyard can feel organized when different activities have defined areas.
The grill does not necessarily need to sit beside the dining table. Instead, use the available layout to establish a cooking zone, a dining zone, and a relaxation zone.
In a compact patio, these zones can overlap through multifunctional furniture. In a larger backyard, they can be separated with furniture, planters, changes in paving, rugs, or landscaping.
This creates a clearer flow for people moving between cooking, serving, eating, and relaxing.
Add Natural Materials and Greenery
Outdoor cooking areas generally look more integrated into a garden when hard surfaces are balanced with natural elements.
Stone, brick, wood, plants, herbs, trellises, and greenery can soften the appearance of a BBQ station.
For a rustic design, reclaimed wood and natural stone can create a warmer appearance. A modern kitchen may instead use stainless steel, concrete, aluminum, or clean-lined stone surfaces.
The material choice should also reflect the local climate and the amount of maintenance you are prepared to perform.
Consider a Pergola or Covered Cooking Area
A roof or overhead structure can make an outdoor cooking space more comfortable by providing shade and some weather protection.
Pergolas, pavilions, wooden roofs, trellises, and louvered structures can all be incorporated into outdoor kitchen designs.
A louvered roof can be particularly versatile because adjustable panels can be opened or closed depending on conditions.
However, overhead structures require careful planning around ventilation, heat, smoke, and the manufacturer’s requirements for the cooking equipment.
Never assume that placing a grill beneath a roof is automatically safe.
Add an Outdoor Sink and Refrigerator
If your outdoor kitchen is used frequently, appliances can reduce trips between the backyard and indoor kitchen.
An outdoor sink can provide a dedicated place for washing hands, rinsing ingredients, or cleaning cooking equipment.
An outdoor-rated refrigerator can keep frequently used food and drinks close to the cooking area.
These features are most valuable when the outdoor kitchen is used regularly. For occasional BBQs, a portable cooler and basic preparation station may provide similar convenience without the additional installation complexity.
Think About Entertainment
Outdoor cooking is often about more than preparing food.
A well-designed area can become a place where people gather while the food is being prepared. Dining furniture, bar seating, outdoor rugs, lighting, and comfortable chairs can turn a basic BBQ station into an entertainment area.
A compact space does not need every feature. A small grill, two or three comfortable seats, and a useful preparation surface can be more functional than a crowded kitchen containing equipment that rarely gets used.
Plan Lighting Around the Way You Cook
Lighting should serve a practical purpose before it becomes a decorative feature.
Solar garden lights can provide low-level pathway or ambient lighting, while string lights can create a more relaxed atmosphere.
For the actual cooking surface, task lighting is more important. Adjustable LED lights, spotlights, battery-powered grill lights, or dedicated prep-area lighting can make it easier to see ingredients and cooking surfaces after sunset.
One notes that many quality solar garden lights can operate for approximately 6–8 hours after a full day’s charge. Actual runtime depends on the product, weather, season, battery condition, and charging conditions.
Keep BBQ Safety at the Center of the Design
A beautiful outdoor kitchen is not successful if it creates avoidable fire hazards.
Grills should be positioned away from houses, fences, dry grass, plants, branches, and other combustible materials. One recommends maintaining at least 3 feet of clearance from structures and flammable materials.
Local fire codes, appliance instructions, and manufacturer installation requirements should take priority over any general spacing guideline.
Concrete, stone pavers, or brick can provide more appropriate surfaces beneath a grill than dry grass or other combustible areas. Wooden decks require particular care because grills and hot surfaces can create additional fire risks.
Avoid placing a grill directly beneath combustible eaves, low branches, or unsuitable pergolas.
Choose Equipment According to Your Space
The equipment does not need to be the largest or most powerful option available.
For example, one portable electric grill example is rated at 1,600 watts, while another example is rated at 1,800 watts. A George Foreman example has a 200-square-inch cooking surface.
A Weber Lumin example is described as reaching 600°F or higher, while a Coleman RoadTrip 225 example provides 11,000 BTUs with a 225-square-inch cooking area.
Another portable Cuisinart example provides 20,000 BTUs from a two-burner configuration.
These figures illustrate how widely outdoor cooking equipment can differ. They should not be treated as a recommendation to choose one particular grill. Match the equipment to the number of people you normally cook for, the available space, fuel type, ventilation, and installation requirements.
Consider a Larger Kitchen Only When You Need It
If you regularly host larger gatherings, a more substantial outdoor kitchen may be justified.
Larger examples can include six-burner configurations, refrigerators, sinks, extensive preparation counters, and dedicated storage.
One example referenced in the material has a cooking area of 688 square inches, while another example lists approximately 95,500 BTUs of heating capacity.
Those specifications are considerably beyond what many small gardens need.
For most homeowners, the better design question is not “How much equipment can I fit?” but “What equipment will I actually use?”
Create a Premium Outdoor Kitchen Look
A high-end appearance does not necessarily require an oversized kitchen.
Materials such as marble, granite, quartz, porcelain, slate, limestone, ceramic, concrete, and natural stone can create different visual styles.
Stainless steel provides a modern appearance, while wood, cedar, teak, and reclaimed materials can create a warmer atmosphere.
Coastal kitchens may use lighter colors and natural textures, while rustic kitchens can emphasize stone and timber. Mediterranean-inspired designs can incorporate tile and greenery, while modern designs often rely on clean lines and restrained materials.
The best choice is the one that complements the existing house and landscape rather than simply copying a trend.
Make Small Spaces Feel Bigger
A small outdoor cooking area can feel significantly larger when visual clutter is reduced.
Keep countertops as clear as possible, store equipment vertically, use furniture with multiple functions, and avoid filling every empty corner.
Light-colored surfaces, open shelving, compact furniture, and consistent materials can also help create a less crowded appearance.
Most importantly, preserve a clear walking route around the cooking station.
A slightly smaller kitchen with comfortable movement is generally more useful than a larger installation that forces people to squeeze between furniture and appliances.
Design Around Your Cooking Routine
The most valuable outdoor cooking space is one that follows a logical sequence.
Food should move naturally from storage to preparation, then to the grill and finally to serving.
Frequently used utensils should be near the cooking surface. Ingredients should have a convenient storage location. Plates and serving equipment should be accessible without crossing through the hottest part of the cooking area.
This workflow becomes even more important in compact spaces because unnecessary movement quickly makes a small kitchen feel cramped.
How Much Does a Small Outdoor BBQ Area Cost?
A budget DIY outdoor BBQ area may start around $200–$500, according to the material, particularly when existing surfaces and reclaimed materials are reused.
However, a complete outdoor kitchen can cost much more depending on cabinetry, countertops, appliances, utilities, structural work, and professional installation.
Storage sheds alone were cited at approximately $15–$150 per square foot, depending on quality.
Instead of setting a budget around a desired appearance, decide which functions matter most. A reliable grill, safe surface, useful storage, and adequate lighting can provide more practical value than expensive decorative features.
What Is the Best Layout for a Small Outdoor Kitchen?
There is no single best layout for every garden, but an L-shaped corner arrangement can be highly space-efficient because it uses the perimeter while keeping the middle open.
A compact grill can occupy one side, while preparation space and storage occupy the other.
For extremely narrow spaces, vertical storage and fold-down surfaces can provide functionality without taking up permanent floor area.
The ideal arrangement should leave enough room for safe movement and comply with the grill manufacturer’s clearance requirements.
How Much Space Do You Need for a BBQ Area?
The required space depends on the grill, fuel type, surrounding construction, seating, and local safety requirements.
Compact built-in examples can occupy approximately 4–6 square feet, while a corner station may use 3–4 feet of wall space on each side.
However, the grill’s required clearances are just as important as its physical dimensions. Always check the manufacturer’s installation instructions and local regulations before deciding how closely the BBQ can be positioned beside structures.
Can You Build an Outdoor Kitchen on a Small Budget?
Yes. A simple cooking area can begin with an existing patio, portable grill, inexpensive preparation surface, storage containers, and basic seating.
Reusing suitable garden furniture and existing paving can reduce construction requirements.
The material suggests $200–$500 as a possible starting range for a budget-oriented DIY small BBQ area, but this should not be interpreted as a guaranteed total project cost.
If you are working with a strict budget, build the cooking area in stages rather than trying to install every feature at once.
Is a Storage Bench Worth Adding to an Outdoor Cooking Area?
A storage bench can be particularly useful when seating and storage are both needed.
The same piece of furniture can provide seating while storing BBQ accessories, cushions, gardening equipment, toys, or outdoor textiles.
Choose a model designed for outdoor exposure and pay attention to waterproofing, UV resistance, ventilation, hardware, and weight capacity.
How Far Should a BBQ Be From a House or Fence?
One recommends a minimum of 3 feet from structures and flammable materials.
However, this should not replace local regulations or the grill manufacturer’s instructions. Some installations may require different clearances depending on the equipment and surrounding structure.
Before installing a permanent BBQ, check the appliance documentation and applicable local fire and building requirements.
How Can I Add Storage Without Making a Small Garden Look Crowded?
Use the walls and other vertical surfaces first.
Wall hooks, pegboards, slatwalls, compact cabinets, hanging baskets, and vertical planters can keep equipment off the floor.
A mobile kitchen cart can also provide storage while remaining movable.
The key is to give every storage element a specific purpose and avoid allowing the cooking area to become general-purpose outdoor storage.
What Lighting Is Best for an Outdoor Cooking Area?
Use different lighting for different jobs.
Ambient lighting such as string lights can make the area comfortable for entertaining, while solar lights can help illuminate paths and surrounding areas.
For cooking itself, task lighting is more important. Adjustable LEDs or dedicated grill lights can illuminate the preparation and cooking surfaces more effectively.
For any electrical installation, use equipment rated for the outdoor environment and follow applicable electrical requirements.
Final Thoughts
The most effective outdoor cooking space is not necessarily the largest one. It is the space where cooking, preparation, storage, movement, safety, and relaxation work together.
For a small garden, start with the essentials: a suitably sized grill, a stable preparation surface, practical storage, and enough clearance to cook safely. Then add features such as fold-down counters, wall hooks, vertical herbs, lighting, seating, or a mobile cart as your needs grow.
For a larger backyard, an integrated kitchen can combine grills, refrigerators, sinks, cabinets, dining areas, pergolas, and entertainment features.
The strongest designs follow one principle: use every available area intentionally. A corner can become a cooking station, an empty wall can become storage, an under-deck space can become a pantry, and a bench can become both seating and hidden storage.
When the design is based on your actual cooking routine rather than simply the number of features you can install, even a modest backyard can become a comfortable and highly functional outdoor cooking space.
7 Comments