
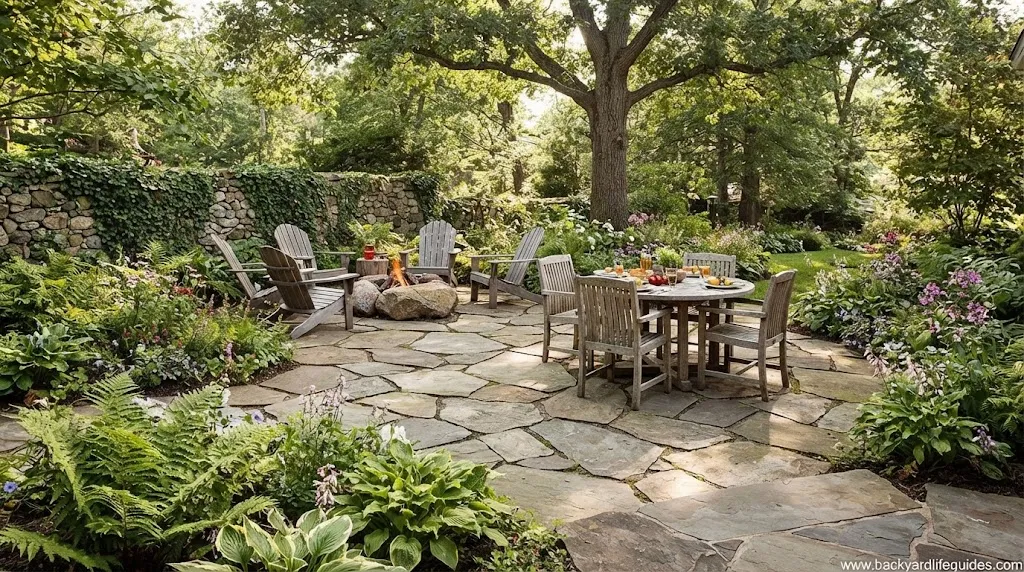
Using Flagstones to Create Rustic Patios: A Complete DIY Guide
- Disclosure: This post may include affiliate links. If you click a link and complete a purchase, I may earn a commission. Additionally, as an Amazon Associate, I earn from eligible purchases.
A flagstone patio can turn an ordinary outdoor area into a warm, natural-looking space for relaxing, dining, entertaining, or enjoying the garden. Unlike perfectly uniform paving materials, natural flagstones have different shapes, colors, textures, and edges that give a patio its rustic character.
The good news is that you do not necessarily need mortar or a complicated masonry system. A dry-set flagstone patio can be built by preparing the ground, creating a compacted base, adding a bedding layer, positioning the stones, and filling the joints.
The key to getting good results is not simply placing attractive stones on the ground. Proper excavation, drainage, base preparation, stone spacing, and leveling all matter. This guide walks through the process and also covers design choices, costs, common mistakes, and long-term care.
What Is a Flagstone Patio?
A flagstone patio is an outdoor surface made from relatively flat pieces of natural stone. The stones may have irregular edges and different sizes, which makes them particularly suitable for rustic and natural landscapes.
Common flagstone choices include:
- Sandstone
- Bluestone
- Limestone
- Slate
- Quartzite
The best choice depends on the appearance you want, local climate, availability, durability, and how the patio will be used.
For a rustic project, irregular stones can create a more relaxed appearance. If you prefer a cleaner design, rectangular or square stones can be arranged in a grid, running bond, or herringbone pattern.
Why Use Flagstones for a Rustic Patio?
Flagstone works especially well when you want the patio to feel connected to the surrounding landscape.
Its natural variation allows you to combine:
- Different stone sizes
- Subtle color variations
- Irregular shapes
- Wider or narrower joints
- Groundcovers
- Gravel
- Garden beds
- Timber
- Water features
A rustic patio does not have to look unfinished. The goal is to create a surface that feels natural but intentional.
Choose the Right Flagstone
Before buying materials, decide how you want the finished patio to look and how it will be used.
Sandstone
Sandstone can provide warm, earthy colors and works well with cottage, rustic, and natural garden designs.
Bluestone
Bluestone commonly provides blue, gray, charcoal, or darker tones. It can create either a traditional rustic appearance or a more structured look.
Limestone
Limestone can offer lighter, softer colors and can work well when you want the patio to blend with a garden.
Slate
Slate provides darker colors and natural texture. It can be useful for patios where you want stronger visual contrast.
Quartzite
Quartzite is another natural-stone option that can provide a distinctive texture and appearance.
Tip: Look at samples when they are both wet and dry. Natural stone can appear significantly darker when wet, so judging it under only one condition can lead to an unexpected finished color.
How Thick Should Flagstones Be?
For a dry-set patio, the identifies 2–3 inches as a practical flagstone thickness.
Some specific patio stones discussed in the research, including Oklahoma Silvermist and Oklahoma Brown, are around 2 inches thick.
Thickness is important because patio stones need to withstand foot traffic and remain stable over a properly prepared base.
Do not focus on thickness alone, though. The quality of the base and the way the stones are supported also have a major effect on the finished patio.
How Much Does a Flagstone Patio Cost?
Cost varies considerably depending on stone type, patio size, location, labor, site conditions, and whether you build it yourself.
One gives a 20 × 20-foot patio estimate of approximately $2,000–$6,000.
The research also gives these example material ranges:
| Material | Example Cost |
|---|---|
| Flagstone material | $10–$30 per sq. ft. |
| Flagstone in material table | $5–$15 per sq. ft. |
| Gravel | $20–$50 per ton |
| Sand | $15–$35 per ton |
| Edging | $1–$5 per ft. |
These figures should be treated as planning ranges rather than fixed prices because local suppliers and stone selections can change the final cost substantially.
It is also smart to purchase approximately 10% extra stone to account for cuts, breakage, and unusable pieces.
Tools and Materials You May Need
A basic dry-set installation can be completed with relatively straightforward landscaping tools.
Tools
- Shovel
- Rake
- Measuring tape
- Mason’s line
- Stakes
- Carpenter’s level
- Hand tamper
- Plate compactor
- Rubber mallet
- Mason’s chisel
- Trowel
- Diamond blade or appropriate stone-cutting equipment
Materials
- Flagstones
- Gravel or crushed stone
- Sand
- Decomposed granite
- Joint filler
- Optional landscape fabric
- Optional edging
You may not need every item. The tools required depend on the size of the patio and whether you need to cut many stones.
Before You Dig: Check Underground Utilities
Before excavation begins, contact 8-1-1 or the appropriate local utility-location service.
This is an important safety step because underground electrical, gas, water, communication, or other utility lines may run beneath the planned patio.
Do not begin digging simply because the area appears clear.
How to Create a Rustic Flagstone Patio
The installation can be approached as a series of manageable stages. Good preparation is more important than rushing through the stone placement.
Step 1: Plan and Mark the Patio
Start by deciding:
- Patio length and width
- Shape
- Access points
- Furniture placement
- Drainage direction
- Relationship to the house
- Location of nearby garden beds
- Whether you want dining, seating, cooking, or fire-feature zones
Mark the perimeter using stakes and mason’s line.
For a square or rectangular patio, measure the diagonals between opposite corners. Matching diagonal measurements help confirm that the layout is square.
A simple sketch can also prevent mistakes when planning furniture and circulation.
Step 2: Excavate the Area
Remove grass, roots, loose soil, and debris from the marked area.
One excavating at least 6 inches for its dry-set approach, while another gives a broader excavation range of 4–6 inches depending on the construction.
The actual depth depends on the thickness of the stones, base materials, soil conditions, and desired finished height.
The important objective is to create enough space for a stable base while maintaining the correct finished elevation.
Step 3: Create a Drainage Slope
Water should not collect underneath or beside the patio.
The recommends a drainage slope of approximately ¼ inch per foot, also expressed as 1 inch per 4 feet.
The slope should generally direct water away from structures.
A properly planned slope can help reduce:
- Standing water
- Saturated base material
- Stone movement
- Drainage problems
- Freeze-thaw damage in suitable climates
Check the slope with a reliable level rather than relying only on visual judgment.
Step 4: Install the Gravel Base
Add compactable gravel or crushed stone as the structural base.
The research provides different thickness recommendations, including 2 inches in one dry-set approach and approximately 3–4 inches or more in another installation method.
For many projects, the required base depth will depend on soil conditions, drainage, climate, patio use, and local construction practices.
Spread the gravel evenly and compact it thoroughly using a plate compactor or hand tamper.
A weak or poorly compacted base can cause the patio to settle or individual stones to move later.
Step 5: Add the Bedding Layer
Once the gravel base is compacted, add a bedding layer.
One dry-set approach uses approximately 1 inch of sand, while another recommends approximately 1–2 inches.
Possible bedding materials discussed:
- Masonry sand
- Decomposed granite
- Sand
- Other suitable granular bedding materials
Spread the material evenly rather than creating random thick and thin areas.
Lightly moistening suitable bedding material can help with compaction, but avoid creating muddy conditions.
Step 6: Arrange the Flagstones
Now comes the most creative part.
Place the stones over the prepared bedding and experiment with different arrangements before committing to the final layout.
For a rustic appearance:
- Mix large and small stones
- Rotate irregular pieces naturally
- Avoid repetitive patterns
- Keep the overall surface comfortable to walk on
- Leave intentional joint spaces
- Use prominent stones as visual anchors
Think of the stones as a puzzle, but do not force every gap to disappear.
If necessary, stones can be cut, chipped, or shaped with appropriate tools.
Step 7: Check and Level Every Stone
Place a carpenter’s level across individual stones and between neighboring pieces.
If a stone sits too high, remove it and adjust the bedding underneath.
If it sits too low, lift it and add more bedding material.
A rubber mallet can help make small adjustments without aggressively damaging the stone.
The goal is a patio that feels stable and comfortable underfoot rather than perfectly flat in every direction. Remember that the overall surface still needs the planned drainage slope.
Step 8: Fill the Joints
Once the stones are positioned and stable, fill the spaces between them.
The identifies several options:
- Sand
- Gravel
- Stone dust
- Polymer sand
- Groundcovers
- Topsoil and grass in suitable designs
For a more natural garden appearance, wider joints can be planted with suitable groundcovers.
For a cleaner finished appearance, a suitable joint-filling material can create a more defined surface.
Sweep the selected filler across the patio so that it settles into the joints, then remove excess material from the stone faces.
How Wide Should the Gaps Between Flagstones Be?
The research gives a broad spacing range of approximately ½–2 inches.
The right width depends on the appearance you want and the type of joint filler being used.
Narrower joints
Narrow joints can make a patio look more structured and architectural.
Wider joints
Wider joints can make the surface feel softer and more natural. They also provide room for gravel or suitable plants and groundcovers.
Do not choose joint width only for appearance. Consider how the spaces will be filled and maintained.
Rustic Flagstone Patio Design Ideas
The installation method is only part of the project. The surrounding design can completely change the character of the patio.
1. Cottage Garden Patio
Combine mixed-color flagstone with:
- Sandstone
- Bluestone
- Limestone
- Creeping thyme
- Moss phlox
- Roses
This approach works particularly well when the patio transitions directly into planting beds.
2. Woodland Retreat
Use natural stone with:
- Ferns
- Hostas
- Wild ginger
- Trees
- Moss
- Shaded planting areas
Allowing greenery to soften the stone edges can create a secluded garden atmosphere.
3. Farmhouse-Style Patio
For a more organized rustic look, use wider rectangular flagstone pieces in a running-bond arrangement.
The research suggests 18–24-inch widths for farmhouse-style flagstone planks.
Reclaimed timber can provide additional contrast around the stone.
4. Curved Seating Area
A curved stone seating wall can define a gathering area without making the space feel overly formal.
A typical seating-wall height mentioned in the research is 18–20 inches.
Add planters, herbs, grasses, or other suitable plants around the wall.
5. Stepping-Stone Connection
Use individual flagstones to connect the patio with another part of the garden.
The research suggests approximately 18–24 inches of spacing for stepping stones.
Always consider comfortable walking distance and the stride of the people who will use the path.
6. Outdoor Kitchen
Flagstone flooring can be combined with:
- Granite countertops
- Slate
- Reclaimed wood
- Weather-resistant cabinetry
- Grilling areas
Plan the cooking and walking zones before laying the stones.
7. Hillside Patio
A sloped property can become an opportunity for a multi-level design.
Use:
- Stepped areas
- Retaining walls
- Garden beds
- Flagstone surfaces
- Water features
Good drainage planning becomes especially important on sloped sites.
8. Desert-Inspired Patio
For warm, dry landscapes, combine natural stone with plants such as:
- Agave
- Barrel cactus
- Palo verde
- Desert marigold
- Brittlebush
- Creeping phlox
Drip irrigation can help reduce unnecessary water use where appropriate.
Plan Your Patio Around How You Will Use It
One of the strongest planning ideas from the research is to determine the purpose of each area before selecting the stone layout.
Think of the patio as several connected “use bubbles.”
Dining zone
Place the dining area where it is convenient to reach from the kitchen or house.
Seating zone
Position chairs or benches toward a garden, view, fire feature, or water feature.
Circulation zone
Leave comfortable routes between the house, seating, dining, and garden.
This approach prevents a common mistake: creating a visually attractive patio that becomes awkward once furniture is added.
Formal vs. Rustic Flagstone Layouts
Flagstone does not always mean irregular shapes.
Random layout
Irregular stones are fitted together to create a natural, relaxed appearance.
Grid
Square or rectangular stones create a cleaner and more organized appearance.
Running bond
Stones are arranged in offset rows and can work particularly well with longer rectangular pieces.
Herringbone
A more structured pattern that creates strong visual movement.
Border bands
A contrasting stone border can frame the main patio area.
Crazy paving
Highly irregular pieces create an informal and artistic appearance.
For a truly rustic garden, a random layout usually provides the most natural character.
Common Flagstone Patio Mistakes to Avoid
A beautiful stone patio can still fail if the underlying construction is poor.
Skipping proper excavation
Simply putting stones on existing soil can lead to uneven settlement and movement.
Building a weak base
Insufficient or poorly compacted base material can cause individual stones to sink.
Ignoring drainage
Water problems can affect the base and contribute to movement, particularly in climates where freeze-thaw cycles occur.
Making four corners meet
When several stones meet at exactly one point, the pattern can become visually awkward and create a weak joint arrangement.
Shift the stones so the pattern feels more natural.
Choosing stone only by appearance
A stone that looks attractive may not be the best option for your climate or intended use.
Consider durability, texture, thickness, climate, and maintenance alongside appearance.
Making every stone perfectly uniform
For a rustic patio, excessive uniformity can remove the natural character you are trying to create.
Forgetting about furniture
Plan the finished patio around tables, chairs, grills, benches, and walking routes before finalizing the layout.
Neglecting maintenance
Natural stone can absorb water and stains. Leaving the surface completely unattended can make cleaning more difficult later.
Dry-Set vs. Mortared Flagstone
There are two broad installation approaches discussed.
Dry-set installation
A dry-set patio places the stones over prepared granular layers rather than bonding them permanently with mortar.
Advantages:
- Allows drainage through joints
- Individual stones can often be lifted and reset
- Easier to repair localized movement
- Natural appearance
- Suitable for many DIY projects
Mortared installation
Mortar creates a more rigid surface.
Advantages:
- More fixed and structured
- Can work well for furniture-heavy areas
- Provides a different visual finish
However, drainage and construction detailing become particularly important because water must be managed correctly.
For a beginner looking for a relatively approachable rustic patio project, the dry-set method is often the more practical starting point.
How to Maintain a Flagstone Patio
Proper maintenance does not have to be complicated.
Sweep regularly
Remove leaves, dirt, and debris before they accumulate in joints.
Wash seasonally
A suitable cleaning routine can help remove surface dirt and organic buildup.
Watch for movement
If an individual stone becomes unstable, address it early instead of waiting for the problem to spread.
With a dry-set patio, an individual stone can often be lifted, the bedding adjusted, and the stone reset.
Consider sealing
The recommends using a quality penetrating sealer because natural flagstone can be porous and may absorb water or stains.
Some guidance recommends reapplying sealer every few years, depending on the product, stone, exposure, and usage.
Always follow the sealer manufacturer’s instructions rather than applying a generic schedule to every type of stone.
Control plant growth
If you intentionally use groundcovers between stones, keep them managed so they do not interfere with walking surfaces or drainage.
How Long Can a Flagstone Patio Last?
A properly constructed flagstone patio can last several decades, particularly when the stone is appropriate for the environment and the underlying base and drainage are well designed.
The longevity of the patio depends on factors such as:
- Stone quality
- Climate
- Soil conditions
- Base preparation
- Drainage
- Installation quality
- Foot traffic
- Maintenance
The stone itself is only one part of the equation. A durable surface can still develop problems if the supporting layers are poorly prepared.
Question Answer
What is the easiest way to install a flagstone patio?
A dry-set installation is generally one of the more approachable methods for a DIY project. It uses a prepared gravel base and bedding layer instead of permanently bonding every stone with mortar.
How deep should you dig for a flagstone patio?
The gives excavation figures ranging from 4–6 inches to at least 6 inches, depending on the installation approach. The required depth should account for the stone thickness, base, bedding material, soil, drainage, and finished elevation.
How thick should flagstones be for a patio?
The research commonly highlights 2–3-inch flagstones for dry-set patio construction. Around 2 inches is also specifically mentioned for certain patio stone products.
How much gravel goes under flagstone?
The reviewed sources give different recommendations, including 2 inches in one approach and approximately 3–4 inches or more in another. Site conditions, soil, climate, and construction method should determine the appropriate base depth.
How much sand goes under flagstone?
A bedding layer of approximately 1–2 inches is discussed, with one dry-set approach specifically using 1 inch.
Should flagstone joints be filled with sand or gravel?
Both are options. The appropriate filler depends on joint width, the desired appearance, drainage requirements, and the overall patio design. Polymer sand is another option discussed in the research.
Can plants grow between flagstones?
Yes. Wider joints can accommodate suitable groundcovers or other planting approaches. Creeping thyme and similar low-growing plants can help create a softer, garden-style appearance.
How much extra flagstone should I buy?
One recommends approximately 10% extra material to account for cuts and breakage. This can also provide spare pieces for future repairs.
Is flagstone good for a rustic patio?
Yes. Its irregular shapes, natural textures, and variation in color make it particularly well suited to rustic, cottage, woodland, farmhouse, and natural garden designs.
How long does a flagstone patio last?
A properly installed flagstone patio can last several decades. Its lifespan depends heavily on stone selection, base preparation, drainage, climate, installation quality, and maintenance.
Is sealing flagstone necessary?
Sealing can help protect porous natural stone from water and stains, but the need depends on the particular stone and environment. If you use a sealer, choose one appropriate for the stone and follow the manufacturer’s instructions.
Final Thoughts
Creating a rustic flagstone patio is less about making every stone identical and more about building a stable, functional, natural-looking outdoor space.
Start with careful planning, mark the area, check underground utilities, establish drainage, and prepare a properly compacted base. For a dry-set approach, the research highlights combinations such as 2–3-inch flagstones, a compacted gravel base, and approximately 1–2 inches of bedding material.
Once the foundation is right, the creative work becomes much easier. Mix stone sizes, use thoughtful joint widths, incorporate garden plants or gravel, and design the patio around how you actually plan to use it.
With good preparation and regular care, a well-built flagstone patio can become a long-lasting part of the landscape rather than simply another outdoor surface.
6 Comments